
Caution
Read this first: when you edit one of your own photos, Save replaces the original on every page that uses it. Use Save As to keep the original and get the edited version as a new picture.
Generate a New Picture
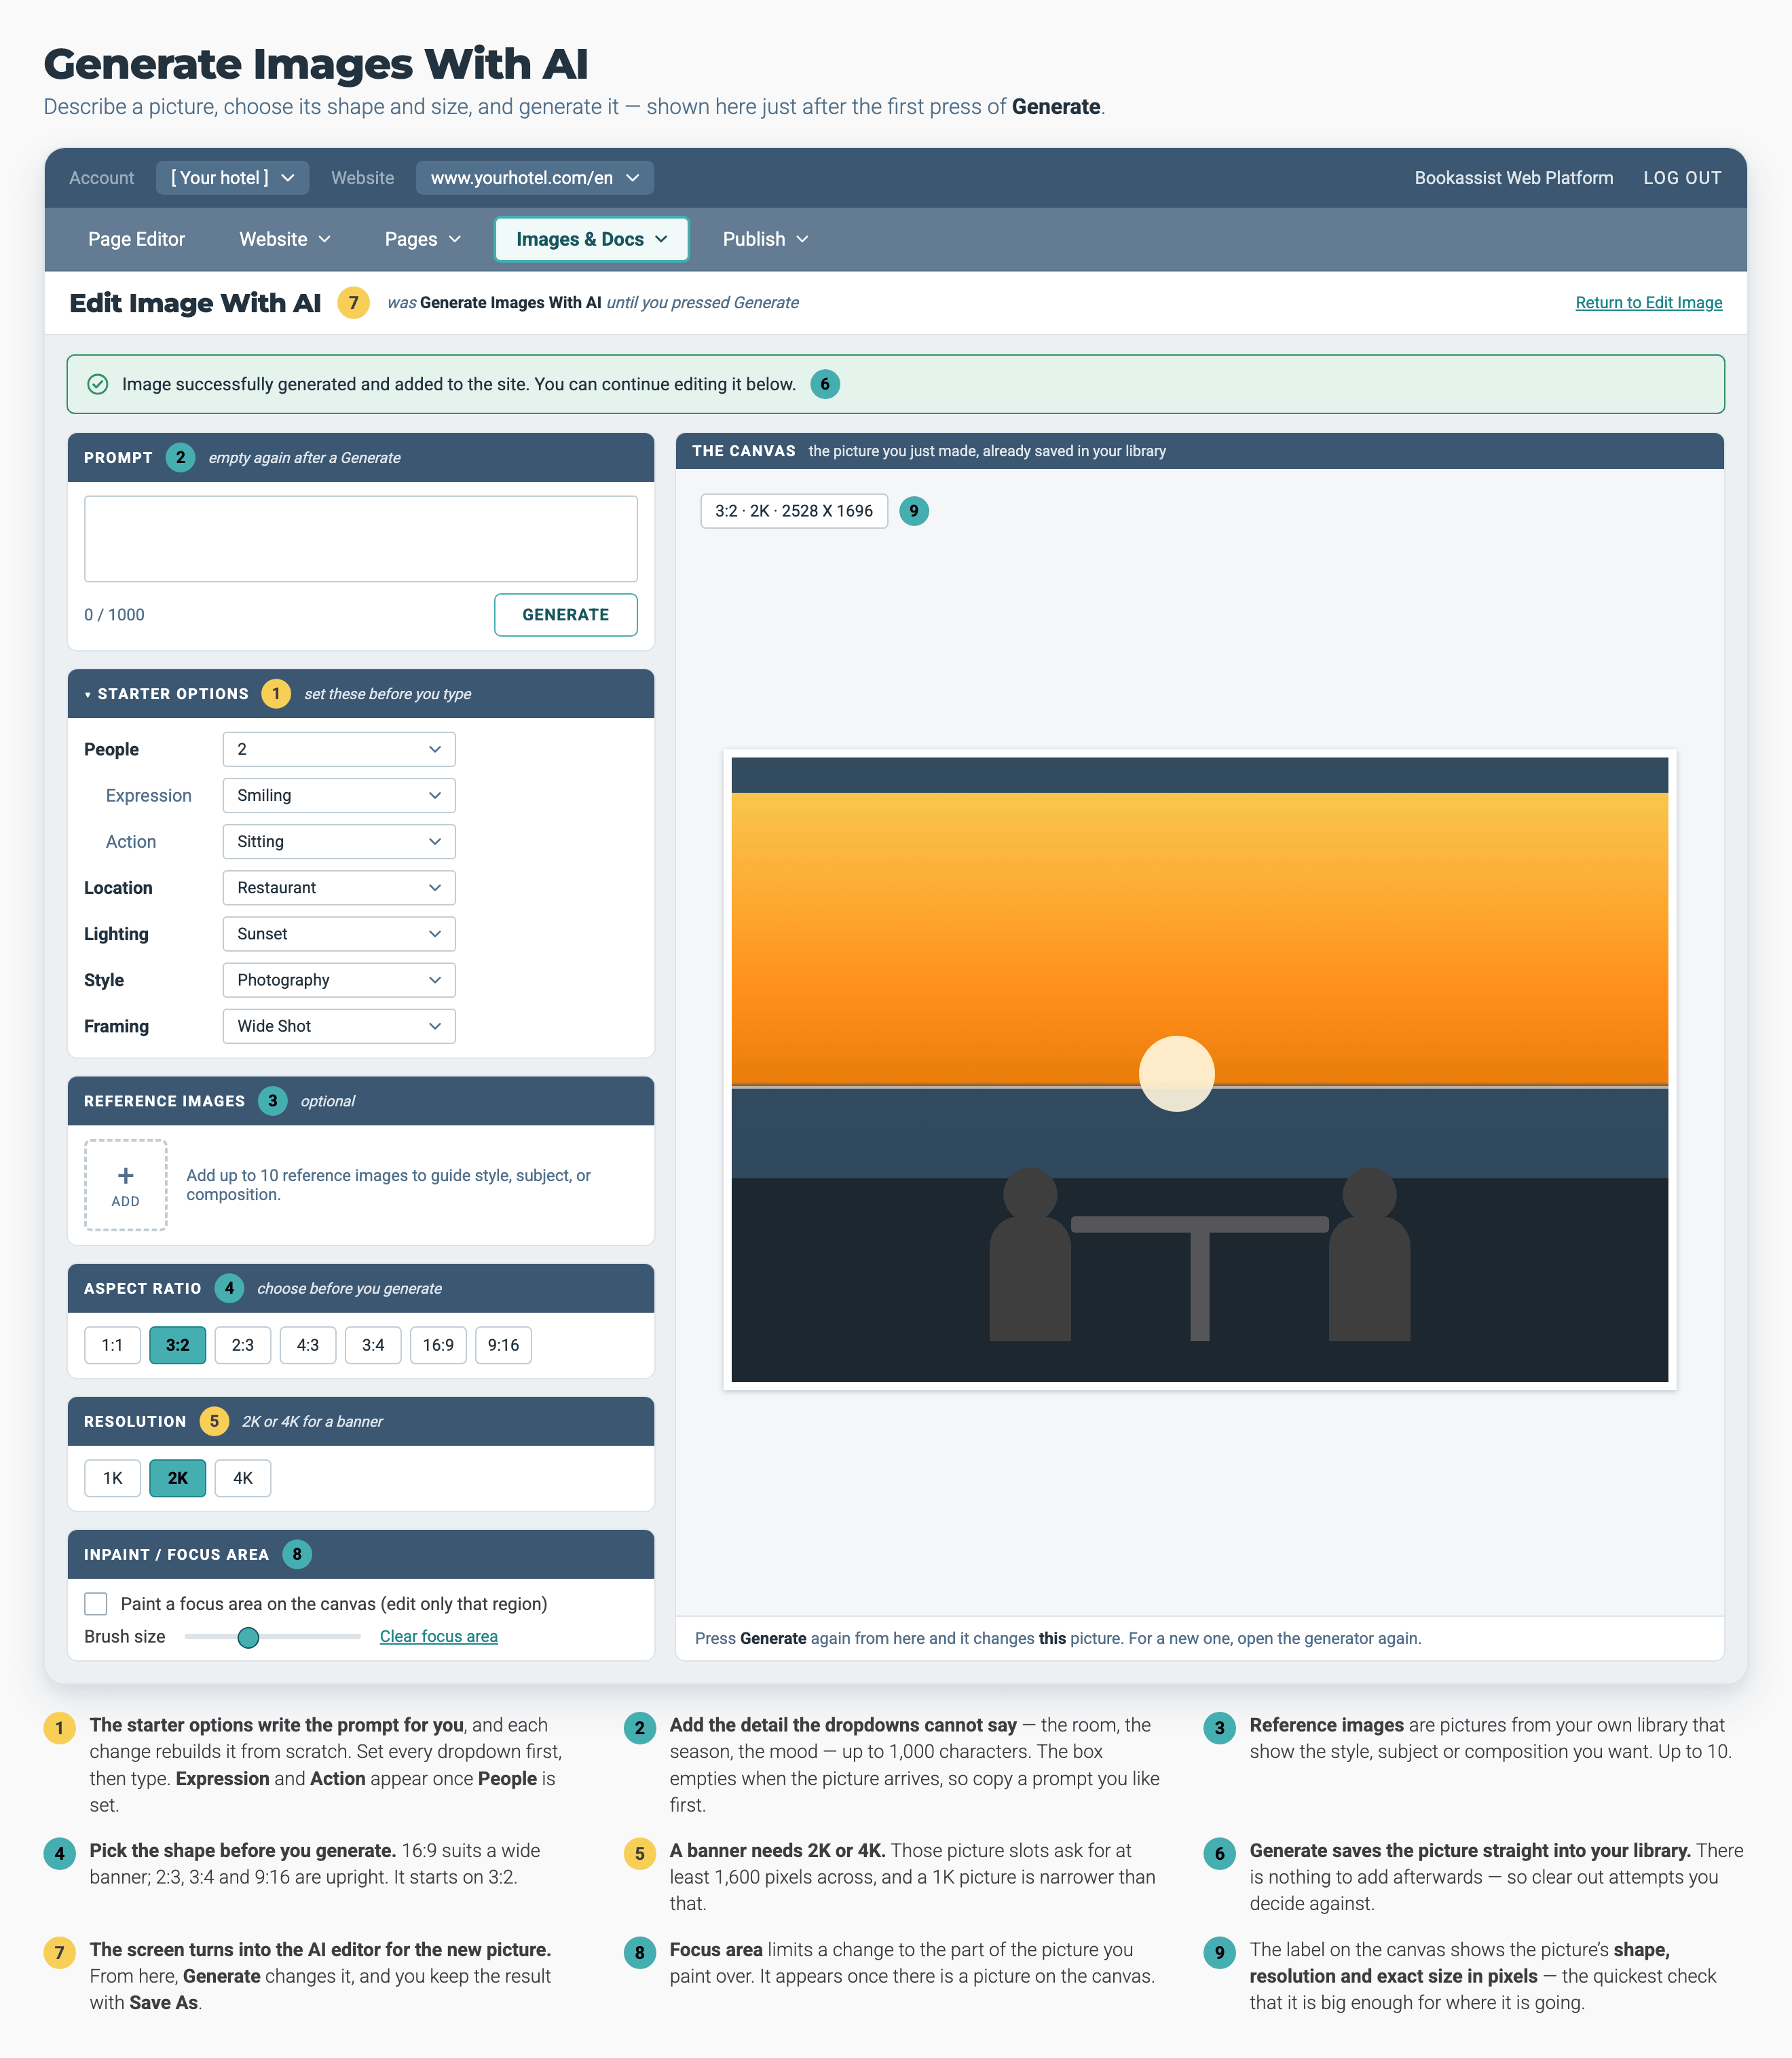
1. Open the Generator
- Navigate: Click Images & Docs in the menu bar.
- Select the Folder: Choose the folder you want the picture in from the Folder dropdown.
- Click Add Images & Docs, then Generate Images With AI.
2. Build the Prompt With the Starter Options
The Starter Options are dropdowns that write the prompt for you: People, Location, Lighting, Style and Framing, plus Expression and Action, which appear once you have chosen People.
- Work Down the List: Each choice builds the Prompt box as you make it. Hotel Lobby plus Morning plus Photography plus Wide Shot is a usable prompt on its own.
- Set Every Dropdown You Want Before You Type.
- ⚠️ A starter option rebuilds the prompt. It does not add to what is in the box. It replaces anything you typed. You are asked first each time, and you can answer Cancel to keep your words.
3. Write the Detail Yourself
- Click Into the Prompt Box: Add what the dropdowns cannot say: the room, the season, the colour, the mood. You have up to 1,000 characters, and a prompt cannot be empty.
- Add Reference Images if You Have Them (optional): Click Add under Reference Images and pick up to 10 pictures from your library to guide the style, the subject or the composition.
4. Choose the Shape and Size
- Aspect Ratio: Pick the shape before you generate: 1:1, 3:2, 2:3, 4:3, 3:4, 16:9 or 9:16. 16:9 suits a wide banner. 2:3, 3:4 and 9:16 are upright.
- Resolution: Choose 1K, 2K or 4K. Higher is larger and sharper.
- ⚠️ For a banner or a homepage header, choose a wide shape at 2K or 4K. Those picture slots ask for at least 1,600 pixels across, and a 1K picture is narrower than that.
5. Generate
- Click Generate: The picture appears on the right, with its shape, resolution and size in pixels in the corner.
- It Saves Itself: The message Image successfully generated and added to the site means it is already in your library. There is nothing to add. If your site requires Image Rights, you choose the folder and the image rights file before it generates.
- You Are Now Editing That Picture: The screen becomes Edit Image With AI, and the Prompt box is empty again. Anything you generate from here changes the picture you just made. See Edit One of Your Own Photos below, where the controls work the same way.
- Want a Completely Different Picture? Go back to Images & Docs and open Generate Images With AI again, rather than generating over this one.
- Give It a Description: A generated picture needs alt text like any other. See How to Fix Image Alt Text.
Edit One of Your Own Photos
The most useful job AI does for a hotel is putting people into your real photographs, so a guest sees the place in use. Examples are a couple at breakfast by the window, a family at the pool, or friends on the terrace at sunset. Paint the area where the people go, and the rest of your room stays as it is.
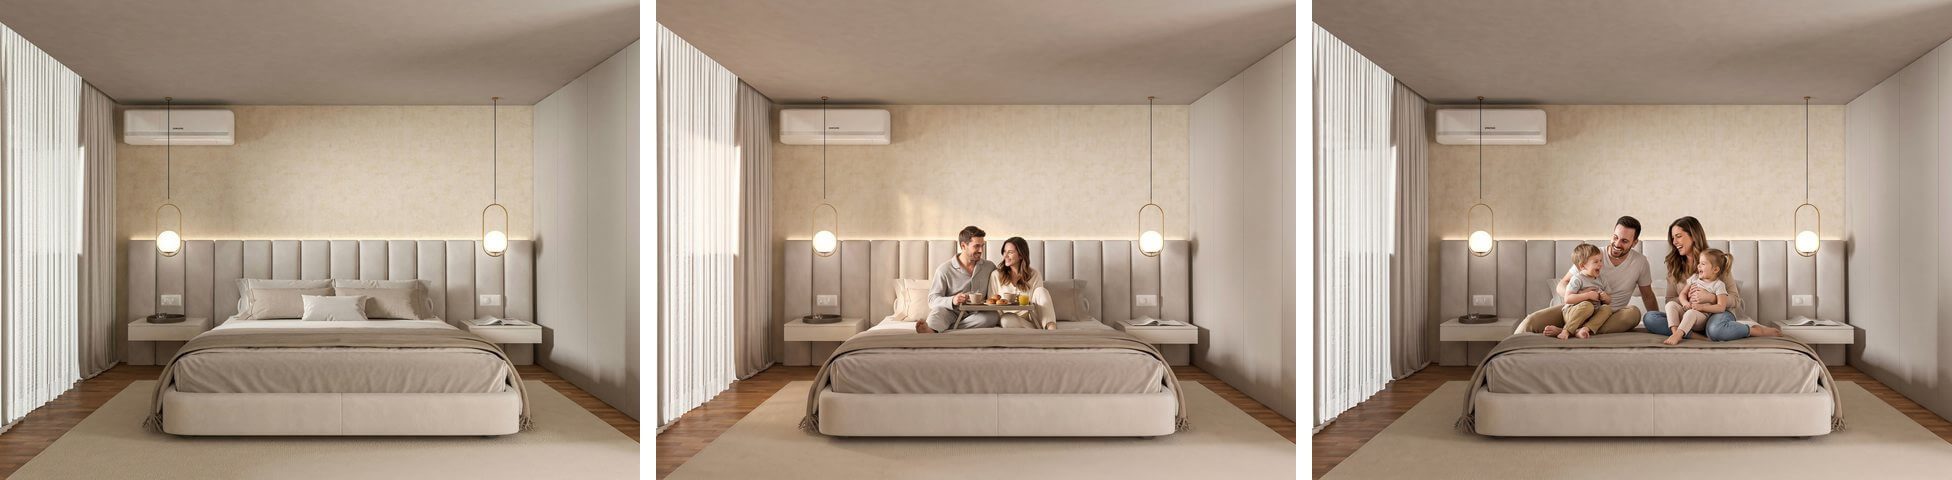
One room photograph, before and after: a couple added for one picture, a family for the other. The bed was painted as the focus area both times, so the room stayed the same.
AI is for changing what is in the picture, not its size. To crop, straighten or shrink a picture, use the regular editor. See How to Crop or Resize an Image.
1. Open the Photo for an AI Edit
- Click Edit on the Picture: In Images & Docs, open the picture's menu and choose Edit.
- Choose Edit with AI: The page that opens asks which kind of edit you want: Edit (resize, rotate, crop) or Edit with AI.
2. Describe the Change
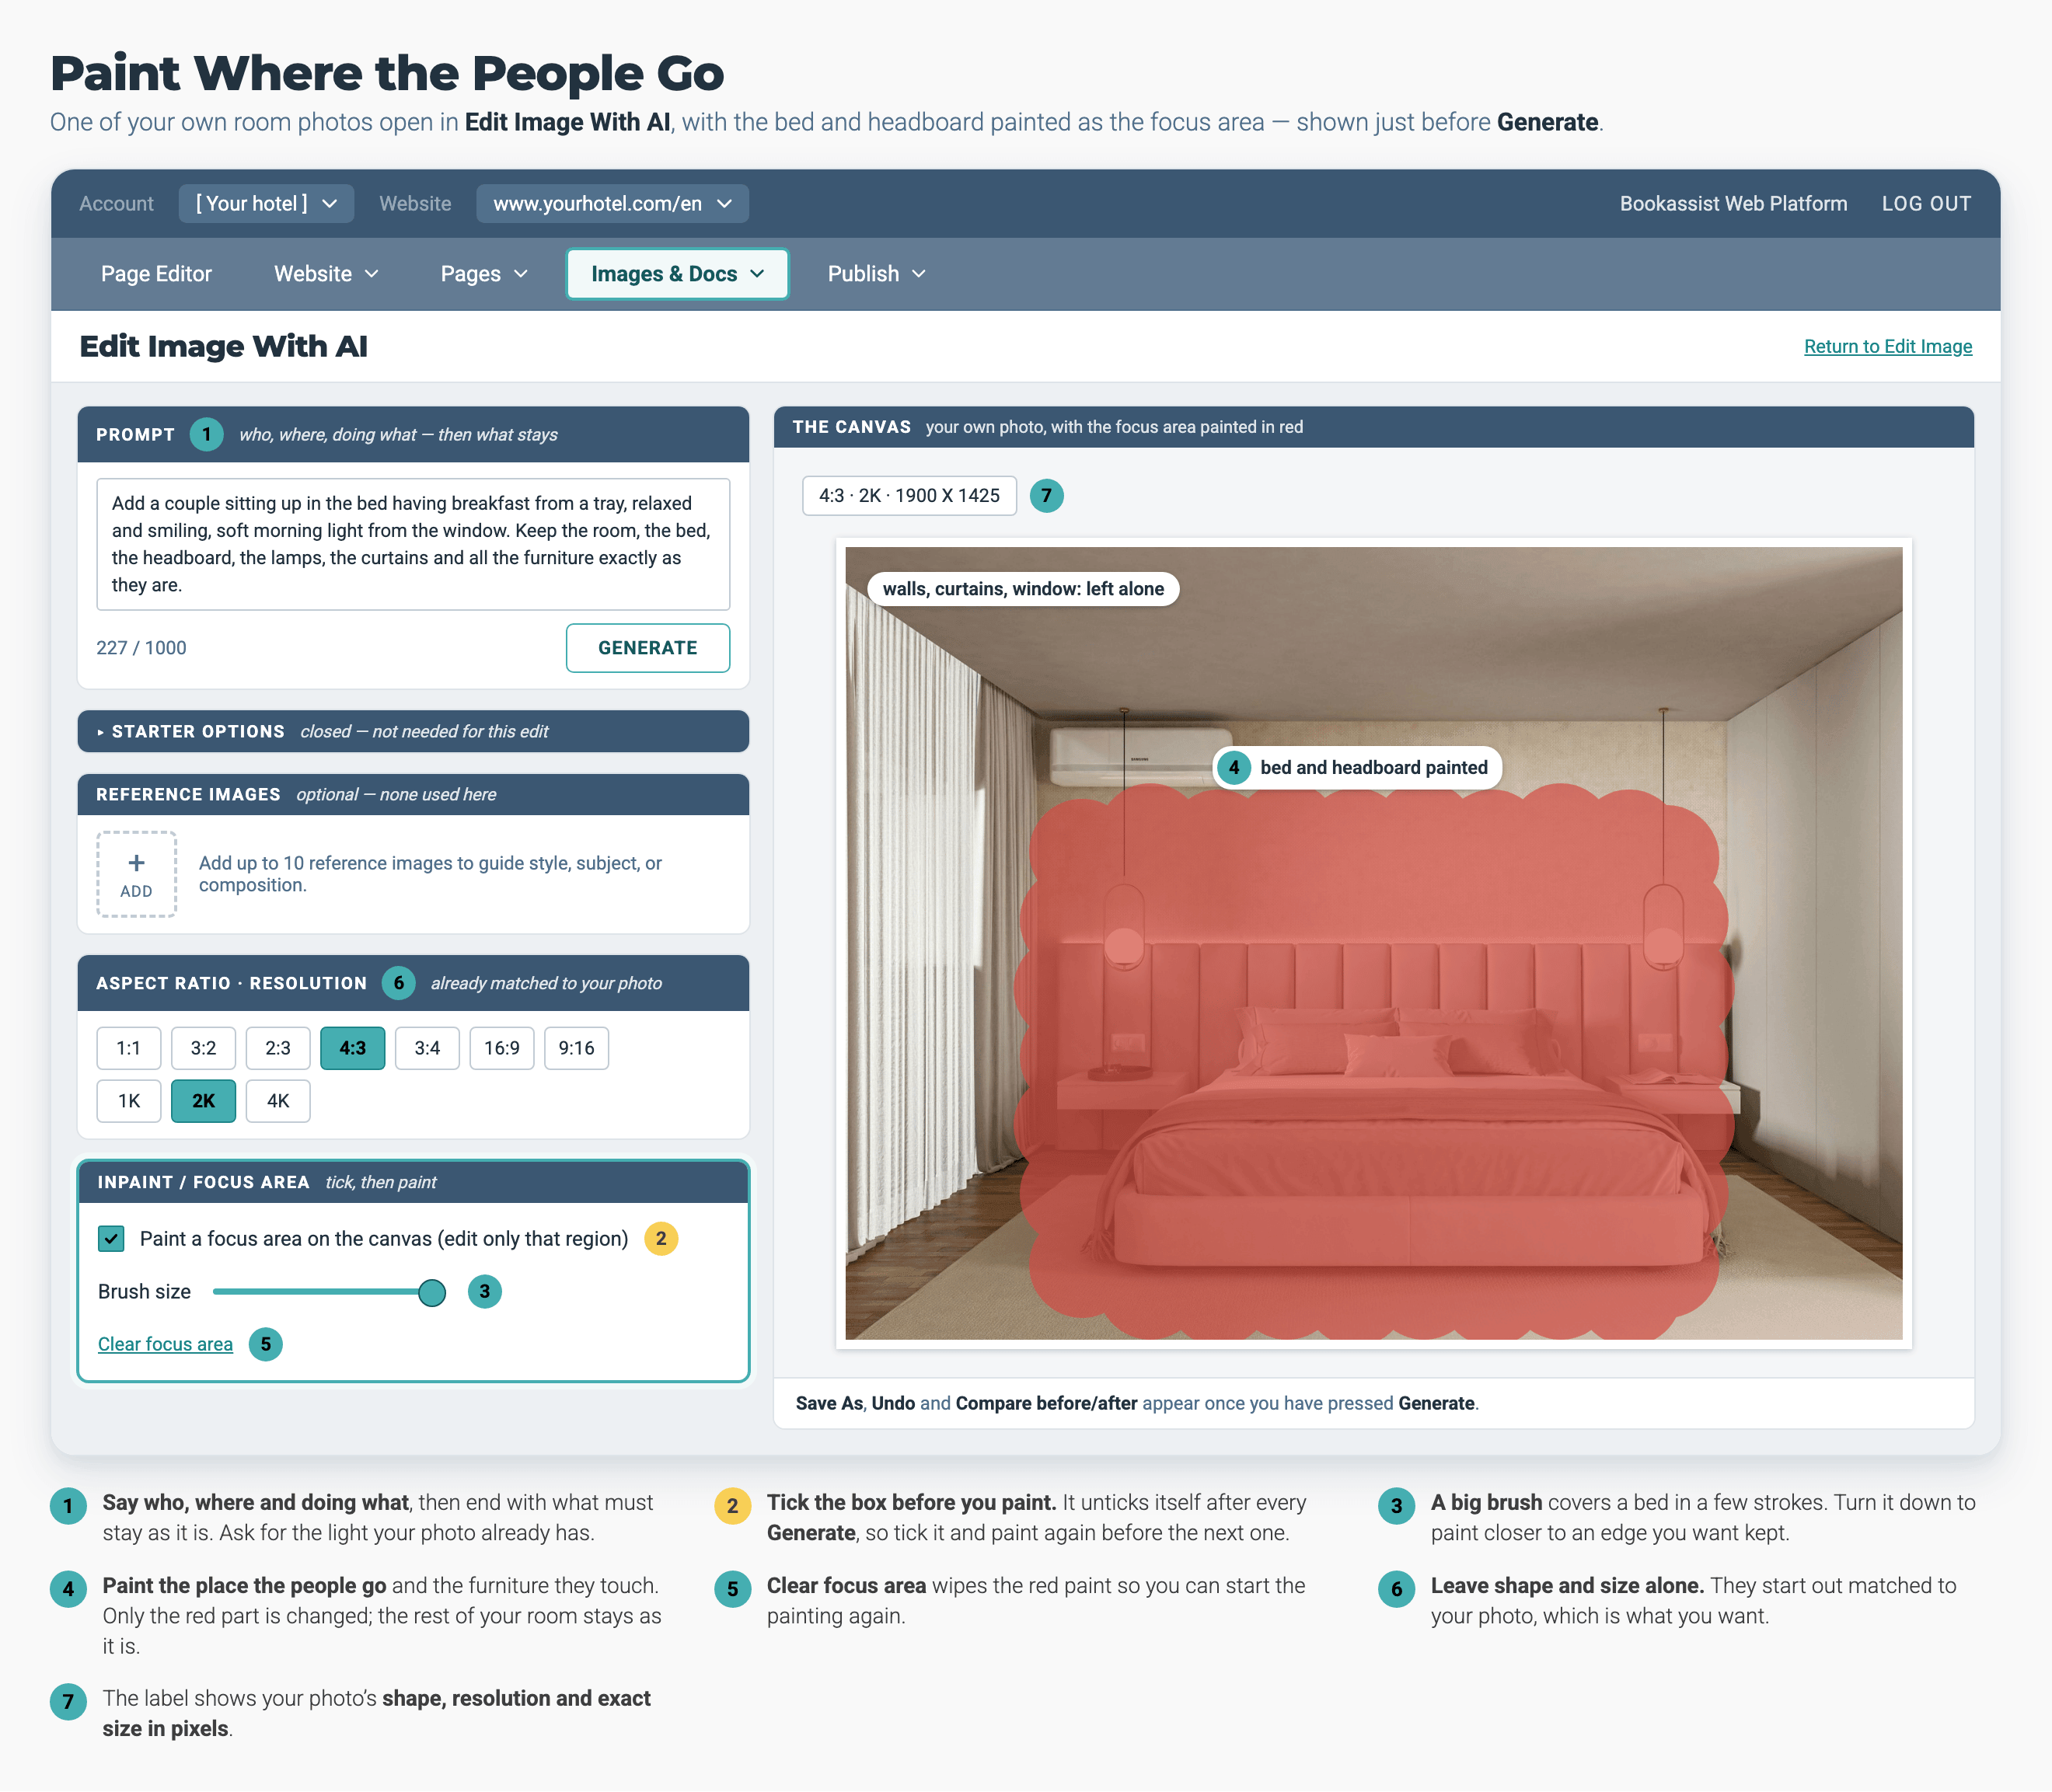
- Write What Should Change: In plain language, up to 1,000 characters. Name who or what, where in the picture, and what they are doing. For example, add a couple sitting up in the bed having breakfast from a tray works far better than add people.
- Say What Must Stay: End with what should not change, for example keep the room, the bed, the lamps, the curtains and all the furniture exactly as they are.
- Ask for the Light Your Photo Already Has: If the photo is in bright daylight, say bright daylight. Asking for different light changes the colour of the whole room.
- Use the Starter Options if They Help: The same dropdowns as on the generator, with the same rule: set them before you type.
- Add Reference Images (optional): Up to 10 pictures from your library, to show exactly who or what to add. A clear description is usually enough.
3. Paint Where the People Go
Do this every time you add people to a room. Without it, AI can redraw parts of the room as well, and add a plant or a picture that was never there.
- Tick Paint a Focus Area on the Canvas.
- Set the Brush Size and Paint over the place the people go and the furniture they touch. For a bedroom, paint the bed and the headboard. The paint shows in red.
- Leave the Rest Unpainted: Walls, windows, curtains and the view stay as they are.
- Clear Focus Area to start the painting again.
- ⚠️ The box unticks itself after each Generate. Tick it and paint again before the next one.
4. Leave Aspect Ratio and Resolution Alone
Both start out matched to your photo, which is what you want. The label in the top-left corner of the picture shows its shape, resolution and exact size in pixels.
5. Generate and Compare
- Click Generate: The result replaces the picture on screen. Nothing is saved yet.
- Compare Before/After: Opens a window with the original and the latest version on top of each other. Drag the slider to the right to see more of the new version, and check that nothing in the room has moved.
- Undo steps back one picture. Start Over discards every edit and returns to the original. You are asked to confirm first.
- Expect a Few Tries: Tighten the prompt each time rather than starting again from nothing.
6. Save As — Not Save
- Click Save As: Choose the folder and a file name (and the image rights file, if your site requires one). The edited picture is added as a new image, and your original is never changed.
- Only Use Save if You Mean to Replace the Original Everywhere: Save lists every page that uses the picture, then Confirm Save overwrites it, and every one of those pages changes with it. See How to Check What Uses an Image.
- Check the Description: A few seconds after you save, alt text is filled in for you, such as a family sitting on a bed. Change it to say the people were added with AI. See How to Fix Image Alt Text.
- Size It for Where It Goes: The new picture is saved large. For a pop-up or an offer card, make it smaller first. See How to Crop or Resize an Image.
Pro-Tips & Troubleshooting
- My edited photo changed on other pages too. It was saved with Save, which replaces the original wherever it is used. Use Save As whenever you want to keep both.
- My banner slot warns about the picture's size. It was made at 1K, or in an upright shape. Generate it again at 16:9 and 2K or 4K.
- The picture is square and my banner is wide. Set Aspect Ratio to 16:9 before you generate. For a photo you already have, crop it rather than asking AI to reshape it.
- I pressed Generate again and it changed my picture instead of making a new one. After the first picture, the screen edits that picture. Open Generate Images With AI again from Images & Docs for a fresh start.
- My prompt disappeared. Either a starter option rebuilt it, or you have just made a new picture with the generator, which empties the box. Set the dropdowns first, type second, and copy a prompt you like before you press Generate.
- Expression and Action are missing. They appear once People is set, because they describe the people. Clearing People hides them again.
- The whole picture changed when I only wanted one corner. Paint a focus area over that corner, and say precisely what should change there.
- A plant or a picture appeared that is not in my room. Press Start Over, paint a focus area over where the people go, and end the prompt with what must stay as it is.
- One photo, two guests. Start from the same room photograph twice: once with a couple, once with a family, each saved with Save As. Show the couple version to visitors who read your romance offer and the family version to visitors who read your family rooms, using personalisation on an offer card or a pop-up. See Personalisation Use Cases and How to Set Up Personalisation. Keep your main banner and gallery as your own photographs, and add a short note beside the picture: Image created with AI from a photograph of the hotel.
- My library is full of attempts I did not use. Every new picture from the generator saves itself, so clear out the ones you decided against. See How to Tidy Up Unused Files.
- Describe the shot, not the subject alone. Hotel terrace at sunset, two people at a table, warm light, wide shot gives you far more than terrace.
- Say what you do not want by saying what you do want. Naming the style, the light and the framing narrows a picture much faster than adding more nouns.
→ Next: How to Fix Image Alt Text — describe the picture you just made
Related: How to Upload Images — adding your own photographs · How to Crop or Resize an Image — changing size or shape without AI · How to Check What Uses an Image — before you save over a picture · How to Generate Content with AI — the same idea for words · Personalisation Use Cases — showing each picture to the right visitors