
Personalisation series (2 of 4): Phase 1: Plan → Phase 2: Build & Apply → Phase 3: Test & Validate → Phase 4: Publish & Monitor
Single-page summary of all four phases: How to Use Targeted Personalisation
A common example is one hero image or offer for visitors on a phone and another for visitors on a desktop.
Part 1 — Create an Audience
An audience is a named group of visitors, defined by one or more rules. You create an audience once and can then use it on as many widgets as you like.
Audiences are shared across your whole domain. One audience works on every website on the domain, including the desktop, mobile and language versions. Its Usage Count adds up across all of them. Build an audience once and share it; do not rebuild it for each site.
Two things follow from that. First, check the existing list before you create an audience, because someone working on another of your sites may already have built it. Second, name your audience after the visitor, not after the offer. Audience names can be seen in your website's code by anyone who looks, so a name like
Condé Nast 15% Rateor20% Trade Ratemakes your commercial arrangements public.Visitors from Condé Nast Travelerdoes the same job safely.
- In the CMS, click Website → Personalization. The Audiences screen opens straight away. There is no separate Audiences link to click.
- Click [ CREATE NEW AUDIENCE ].
- Enter an Audience Name that describes the visitors, for example
Visitors on Mobile Devices. - Click [ QUICK SAVE ]. The Edit Audience screen opens for your new audience. You can only add rules after this first save.
Add a Rule to the Audience
Scroll down to the Add Audience Rule section. It is already open on the screen, so you do not need to click anything to reach it.
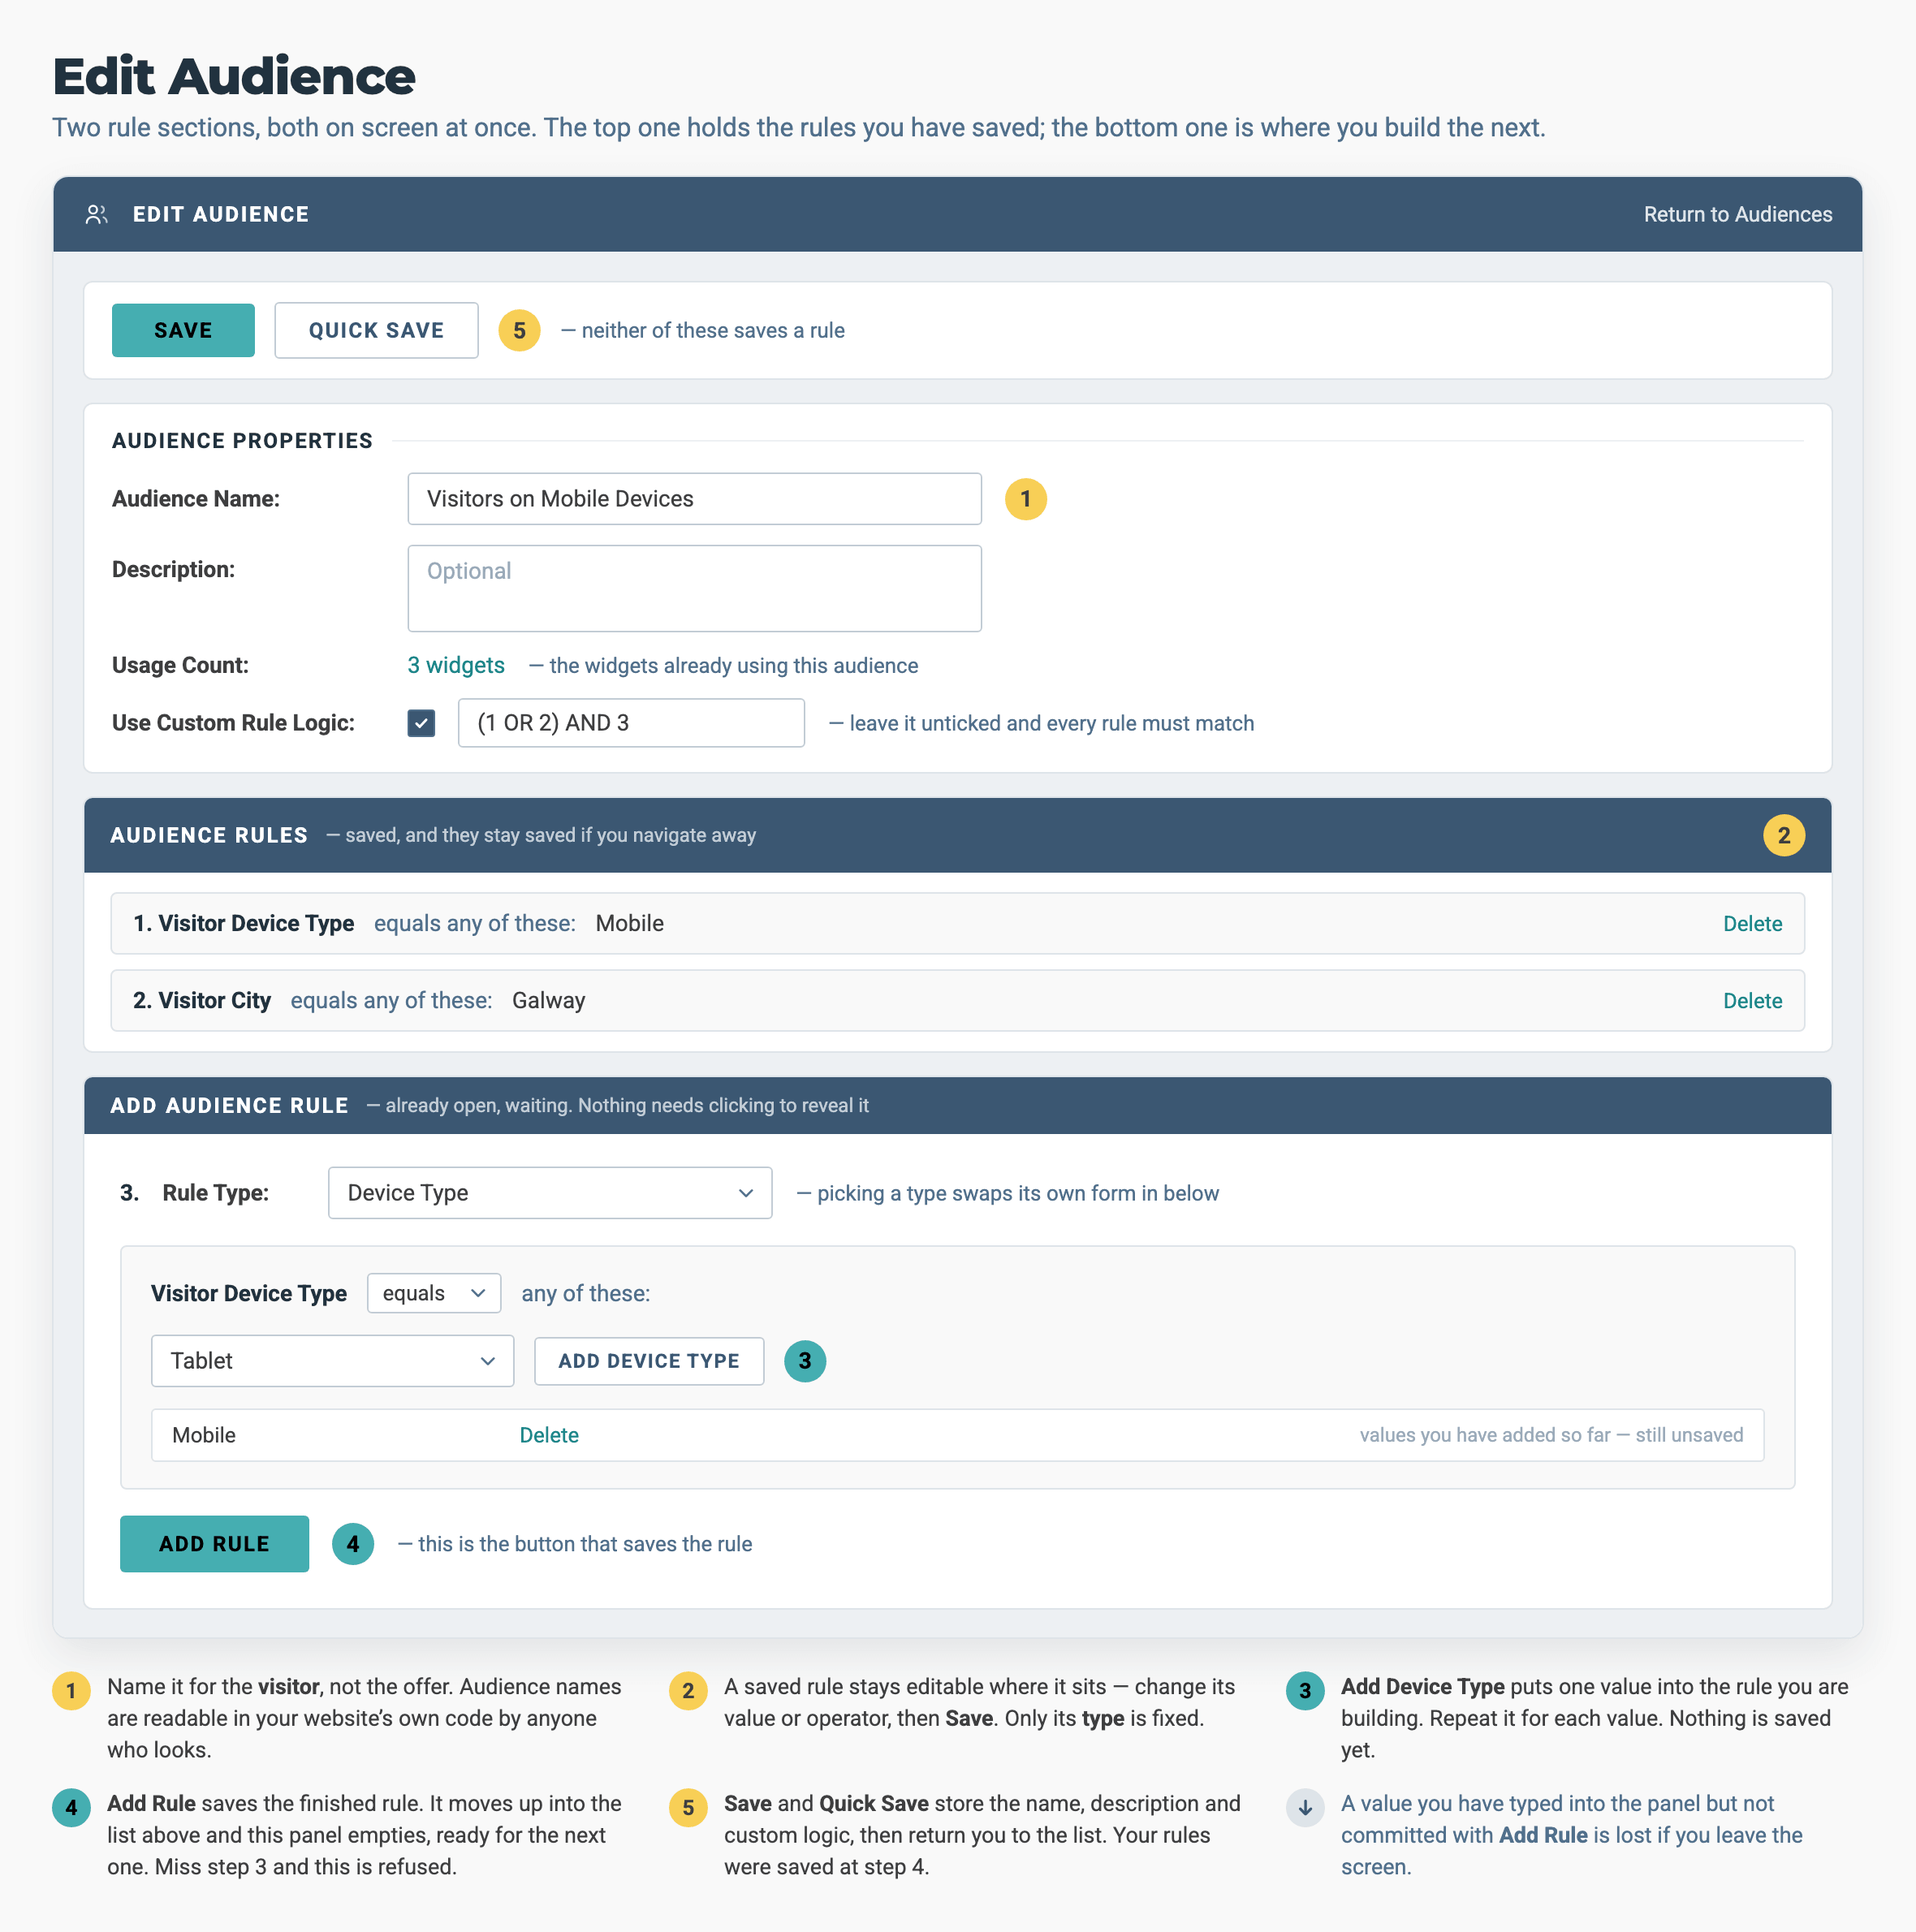
- From the Rule Type dropdown, choose the type of rule, for example Device Type.
- A Visitor Device Type panel appears. From its dropdown, choose a device, for example Mobile.
- Click ADD DEVICE TYPE. Your choice joins the list in the panel. The rule is not saved yet.
Two clicks, two different jobs. ADD DEVICE TYPE puts the value into the rule you are building. [ ADD RULE ] saves the finished rule. If you miss the first click, the second is refused, with a message telling you the rule needs a value.
- Repeat steps 2 and 3 to add more device types if you need them, for example Tablet.
- Click [ ADD RULE ]. Your rule is saved and moves up into the Audience Rules list. The Add Audience Rule panel clears, ready for the next rule.
You can change a saved rule, except for its type. You can edit its value and its operator where they sit in the list: change them and click SAVE. Only the rule type is fixed. To change the type, delete the rule and add a new one. Read the note on numbering below first, because deleting a rule affects the others.
Combine Multiple Rules in One Audience
An audience can hold more than one rule. This is how you build the two-rule audiences in the Phase 1 blueprint, such as Device Type equals Mobile AND City equals [Property City].
- Add the next rule: build it in the same Add Audience Rule panel and click [ ADD RULE ] again. Each saved rule joins the Audience Rules list above, numbered 1, 2, 3 and so on.
- Leave the default for "all of these": rules are combined with AND, so a visitor must match every one. For the blueprint example you need two rules, a Device Type rule and a City rule, and nothing else.
- Tick Use Custom Rule Logic for "either of these": the tickbox is in the Audience Properties section. A Custom Rule Logic field appears above the rules. Type an expression that uses the rule numbers, such as
(1 OR 2) AND 3. - Save the audience: click [ SAVE ] or [ QUICK SAVE ]. Both save the audience's name, description and custom logic, then return you to the audience list. Your rules were already saved when you clicked [ ADD RULE ]. A value you added to the panel without clicking [ ADD RULE ] is lost when you leave the screen.
The order you add rules in does not matter. A visitor has to match all of them, whatever the order. The numbers matter only if you tick Use Custom Rule Logic, because your expression refers to rules by number. Deleting a rule renumbers the rules below it and rewrites your expression. Read the expression again afterwards and check it still says what you meant. Editing a rule where it sits leaves the numbers alone, so it is the safer way to make a change.
Deleting a rule that your Custom Rule Logic expression uses. The rule is not deleted straight away. The Delete link changes to [ Try Delete Again ] / [ Cancel Delete ]. Take the rule's number out of the expression first, then confirm the delete.
Part 2 — Apply the Audience to a Widget
Personalisation replaces the content inside a widget that is already on your page: its headings, text, images and buttons. You are not adding a new widget. The widget stays the same, and only its content changes for the audience you choose.
You can only replace what is already there. If the original has a heading and text but no image field, you cannot add an image in the replacement.
Finding the right widget. When several widgets of the same type sit on top of one another in the Page Editor, for example several pop-ups, use Website Overview to pick out the one you want before you edit. That way you do not change the wrong one.
Check what is already in use. Before you attach a new audience to a widget, look at the Usage Count column on the Audiences screen. It shows which audiences are already in use, so you can spot existing set-ups and remove any you no longer need.
Personalisation is always set on an individual item inside a widget, such as a slide, a card, an intro entry or a modal window. No widget offers it on its main editor, and only widgets built for personalisation offer it at all.
The simplest widget to start with is Introduction 1.0. It holds a list of intro entries, and you reach Personalization by opening one of them.
Check that your widget can be personalised before you plan around it. Similar names are no guide: CTA Carousel 1.0 can take a replacement and CTA Grid Carousel 1.0 (Premium) cannot, even though they sit side by side. There are two quick ways to check. When you add a widget, look at the Personalization category in the widget picker. A widget that can be personalised is listed there as well as under its own category. For a page you have already built, go to Website → Personalization and click [ VIEW ENABLED WIDGETS ] for the full list.
Every widget that can be personalised gives you two controls, in two places. Choose between them by what the campaign needs, not by the type of widget:
Add Replacement (on Hero Carousel the label is sometimes shortened to Replace)
Where it is: On the item's row in the widget's list: an intro entry, slide, card, feature item or modal window. Buttons and images inside an item have their own rows too
What it does: Makes a copy of the item for one audience. The copy sits under the original as a Personalization Replacements row. If an item has several replacements, the first one from the top that matches the visitor is shown. Drag them to change the order
Use it when: Everyone else must still see the original. The original stays as the default
Select Audience
Where it is: Inside the item's own editor, in the PERSONALIZATION panel at the top
What it does: Ties the open item to an audience. The item is then shown only to that audience
Use it when: You are giving a replacement its audience, or you have an item that only one audience should ever see, such as a pop-up for one audience
Take care with Select Audience on an original item. If you click Select Audience on the original, everyone outside the audience stops seeing it. If other visitors still need content there, click Add Replacement and choose the audience on the replacement.
A replacement with no audience is shown to every visitor. It is not a hidden draft: it replaces the original for everyone. You can tell at a glance which items have an audience. An item or replacement with an audience carries a person icon, and hovering over the icon shows the audience name. No icon means no audience.
Every replacement starts out this way. The Select Audience button does not work until the replacement has been saved once, and the panel tells you so. So for a moment your new replacement is set to show to everybody. Save the replacement, choose its audience straight away, and do not publish in between. If you have to stop halfway, delete the replacement and start again later.
Before you publish a page, check that every replacement on it has an audience.
For Modal Popup 1.0, where the pop-up is shown only to the audience and there is no pop-up for everyone else:
- Hover over the widget in the Page Editor and click Edit. The widget editor opens and lists its Modal Windows.
- Find the modal window you want and click Edit, or click ADD NEW to make a new one.
- Set its trigger and content, then click Save. A new modal window must be saved once before Personalization can be used.
- Open the modal window again and go to the Personalization section at the top of its editor.
- Click Select Audience and choose your audience from the list, for example
Visitors on Mobile Devices.
For Introduction 1.0, where the original intro stays in place for everyone else:
- Hover over the widget in the Page Editor and click Edit. The widget editor opens and lists its intro entries.
- Click Add Replacement on the row of the intro entry you want. A copy appears beneath the original. Buttons inside an entry have their own Add Replacement too.
- Open the replacement. If it does not open by itself, click Edit on its row.
- Write the replacement heading, paragraph and buttons, then click Save.
- Open the replacement again. In the Personalization panel at the top, click Select Audience and choose your audience from the list. Do this straight away, for the reason given in the warning above.
For a widget with several items (Hero Carousel, CTA Carousel, Feature List), where the original item stays in place for everyone else:
- Hover over the widget in the Page Editor and click Edit. The widget editor opens and lists every item.
- Find the slide, card or feature item you want and click Add Replacement on its row. On Hero Carousel the label is sometimes shortened to Replace. A copy appears under the original as a Personalization Replacements row.
- Open the replacement. If it does not open by itself, click Edit on its row.
- Set up the replacement content, then click Save.
- Open the replacement again. In the Personalization panel at the top, click Select Audience and choose your audience from the list. The original item stays as the default for all other visitors.
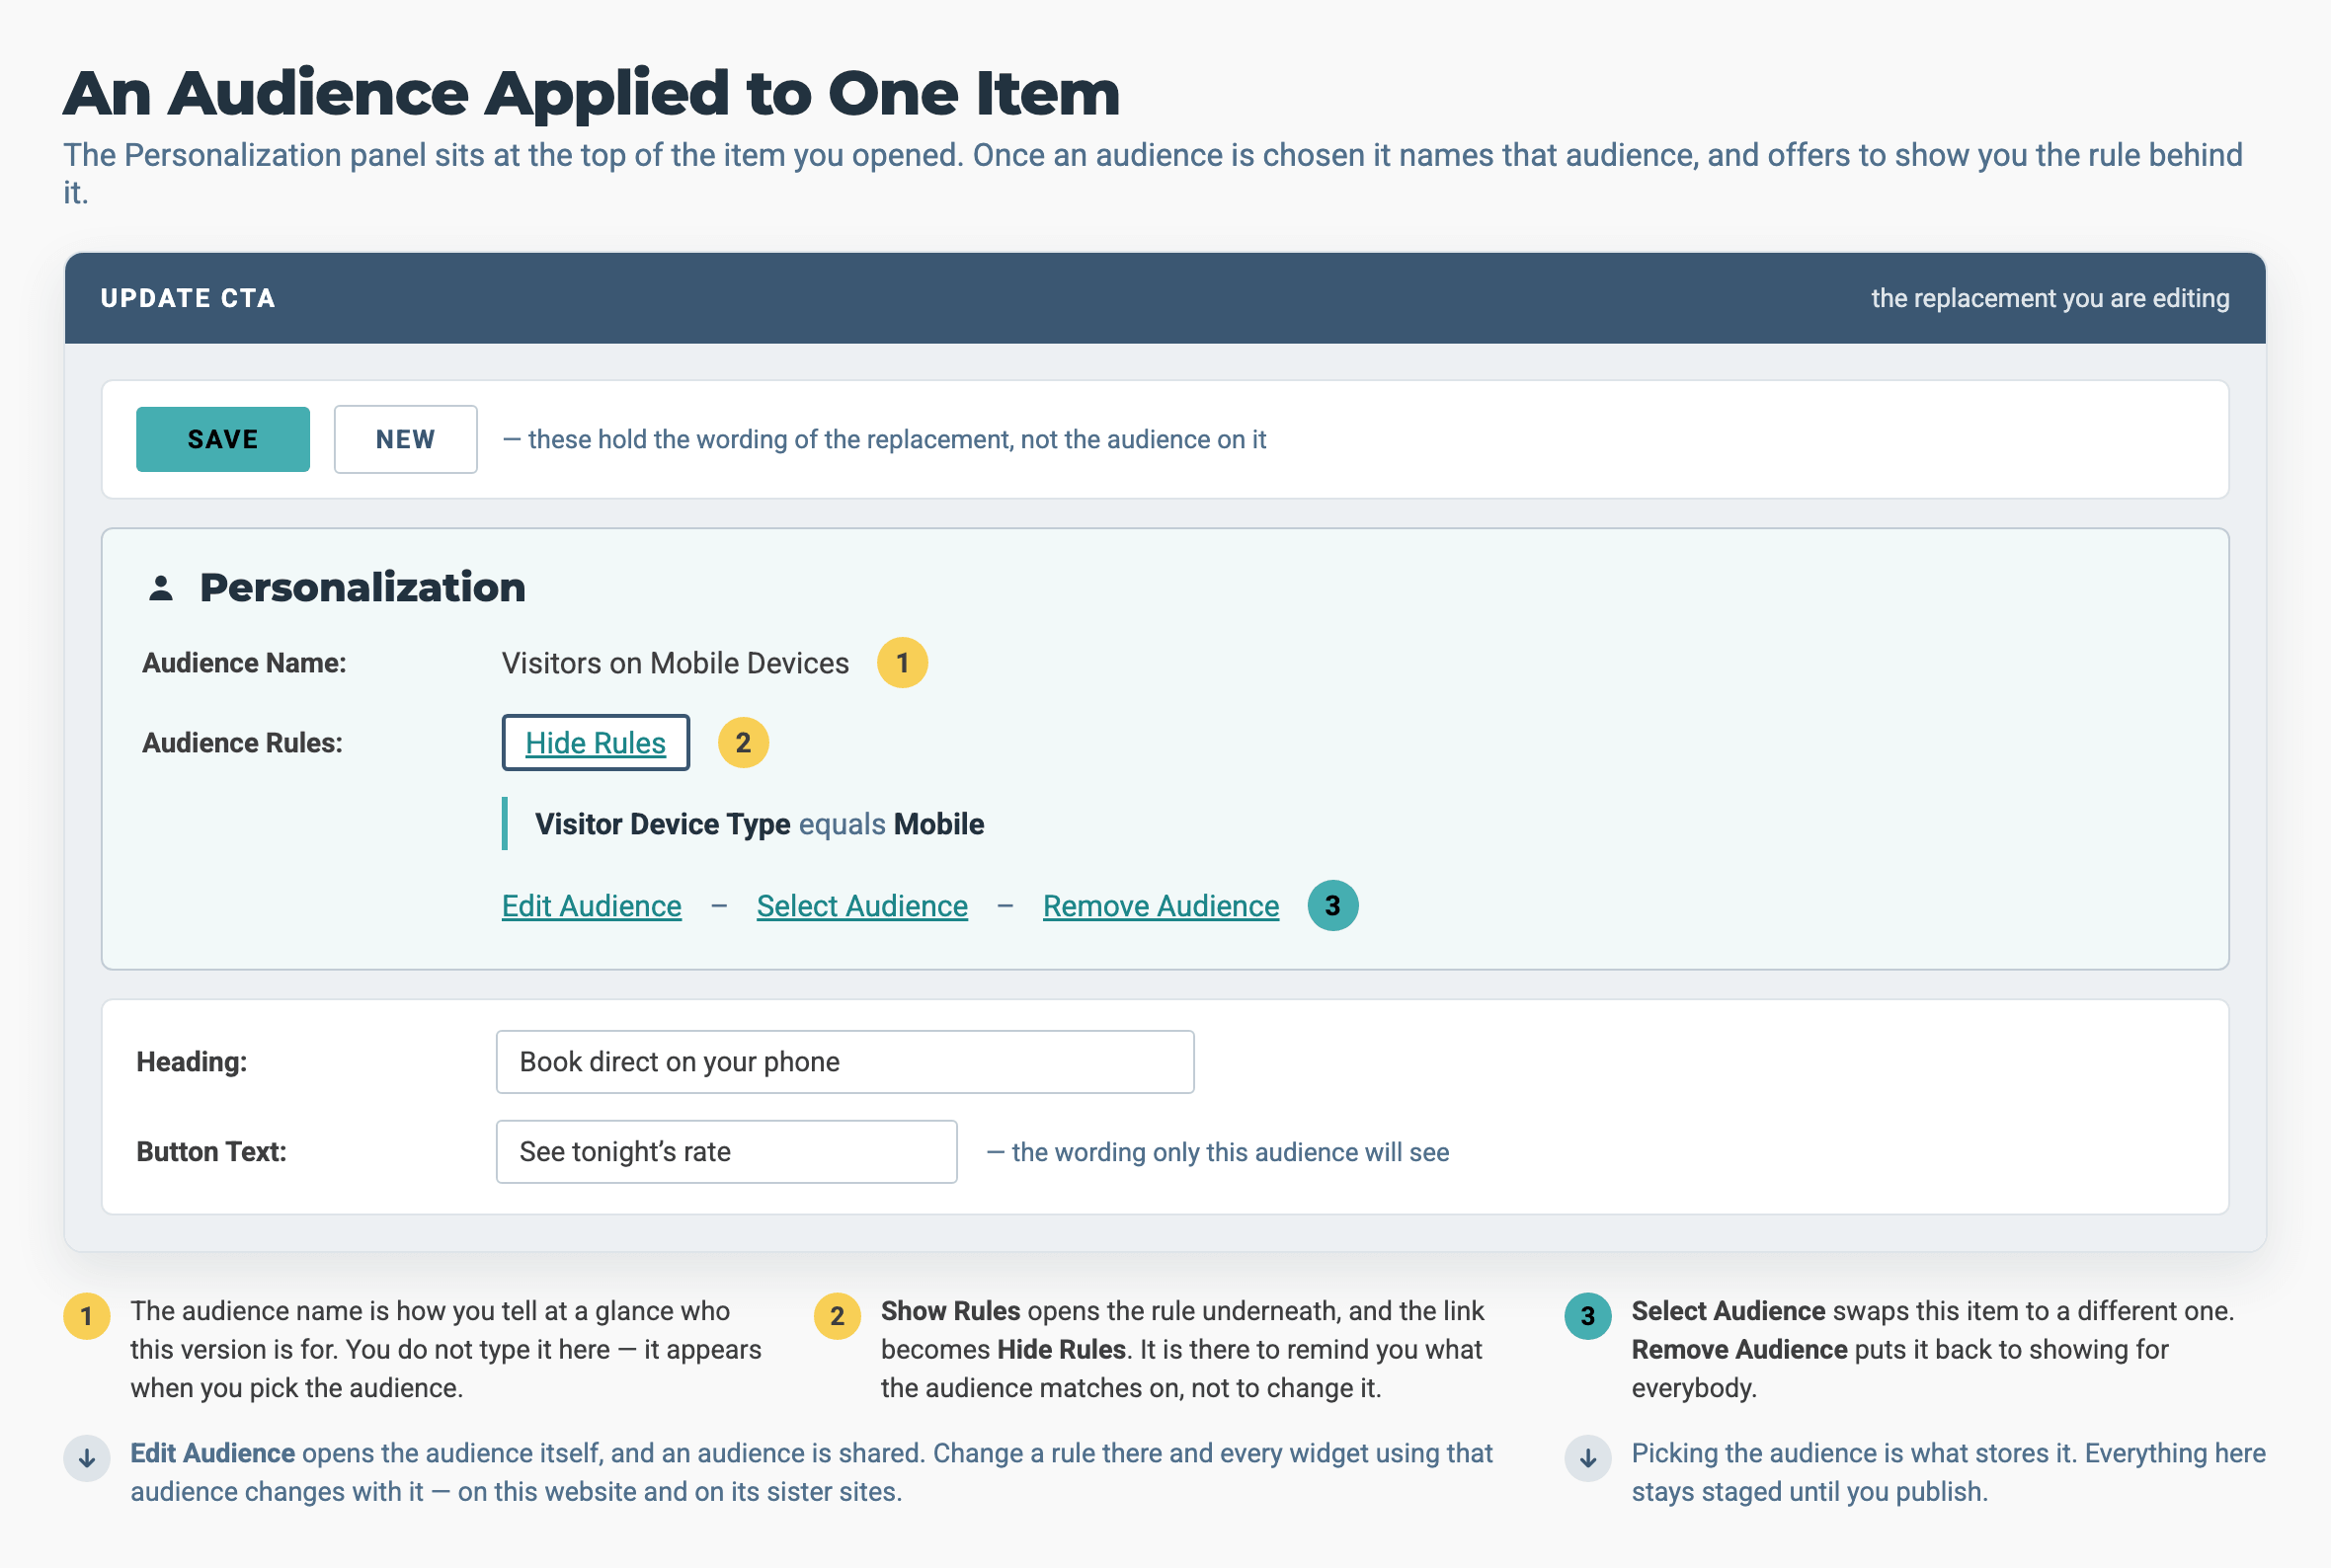
The replacement is now shown only to visitors who match the audience's rules. Everyone else sees the original item, unchanged.
Choosing the audience saves it. You do not need to save the widget editor again. Your replacement, its content and its audience are all saved as soon as you pick the audience. Nothing is live until you publish.
Mobile layout. An audience rule decides which content a visitor sees. It does not change how the widget is laid out on a small screen. When you target mobile visitors, also add the visibility class for your theme to the widget's Optional Class field:
visible-xson one group of themes,d-lg-noneon the other. The next section explains which is which.
Alternative — CSS Class Visibility (Legacy Method)
For simple cases you do not need an audience at all. You can show or hide a whole widget by device by typing a visibility class into its Optional Class field.
-
visible-xs - Extra-small (phones)
-
visible-sm - Small (tablets)
-
visible-md - Medium (small desktops)
-
visible-lg - Large (desktops)
-
hidden-xs - Hides on phones
-
hidden-sm - Hides on tablets
Which classes work on your site depends on its theme. The six above work on Luna's original build, Aurora, Interstellar, Gemini and Equinox. Supernova, Retrograde, Atlas, Neptune and Solstice use a different set. On those themes, d-lg-none shows a widget on phones and tablets and hides it on desktop. A class from the wrong set does nothing at all, so ask your account manager which theme your site uses before you enter either.
Example: on a site that uses the first set, enter visible-xs visible-sm in the Optional Class field and save. The widget then shows only on phones and tablets.
Which method to use. The class method is quicker to set up and suits a simple show or hide by device. Use an audience when you need to combine rules, such as device and location together, or when you want results reported for each audience separately.
Troubleshooting
The rule shows "No Device Type values have been added"
Cause: You chose a device from the dropdown but did not click ADD DEVICE TYPE
Fix: Choose the device again and click ADD DEVICE TYPE
The Page Editor does not show your personalised content
Cause: The Page Editor always shows the default content, whatever the audience
Fix: Use the Test Personalization tool or the mobile QR code. See Phase 3: Test & Validate
The widget is not visible after you apply an audience
Cause: The audience was not saved, or the widget was not saved after the audience was applied
Fix: Save the audience, then open the widget again and save it
There is no Personalization section in the widget editor
Cause: Personalisation is set on an item inside the widget, not on the widget's main editor
Fix: Open the individual modal window, slide, card or feature item. The Personalization section is there
Select Audience cannot be clicked on a modal window
Cause: The modal window is new and has not been saved yet
Fix: Save it once, then open it again and choose the audience
Most visitors no longer see the default content
Cause: Select Audience was clicked on the original item, so only the audience sees it
Fix: Remove the audience from the original. Click Add Replacement on its row and choose the audience on the replacement
A rule's Delete link changes to Try Delete Again / Cancel Delete
Cause: Your Custom Rule Logic expression uses that rule's number
Fix: Change or clear the expression first, then confirm the delete
A visitor who matches several audiences sees the wrong content
Cause: The first replacement from the top of the list that matches the visitor is the one shown
Fix: Drag the replacements into your planned order, most specific first. Plan for overlaps in Phase 1. See Phase 1: Plan
Every visitor sees the replacement content
Cause: The replacement has no audience, so it replaces the original for everyone
Fix: Open the replacement and click Select Audience
→ Next: Phase 3: Test & Validate, where you check each audience behaves as planned before you publish.
Related: Personalisation Use Cases, six ready-made campaigns.
Want help with your personalisation?
Our team can help you plan and carry out your personalisation goals — choosing the visitors worth treating differently, deciding what each of them should see, and building, testing and publishing the campaign with you.
Email support@bookassist.com and tell us what you want to achieve — more direct bookings from returning guests, a seasonal offer for one market, or anything else you have in mind.