
Personalisation series (3 of 4): Phase 1: Plan → Phase 2: Build & Apply → Phase 3: Test & Validate → Phase 4: Publish & Monitor
Single-page summary of all four phases: How to Use Targeted Personalisation
You have two tools. The Test Personalization tool lets you view a page as a made-up visitor, and it covers every rule type. Get Mobile QR Code opens the page on a real phone, so you can check how device rules look there.
Do not skip this phase. The Page Editor always shows your default content, whatever replacements you have added.
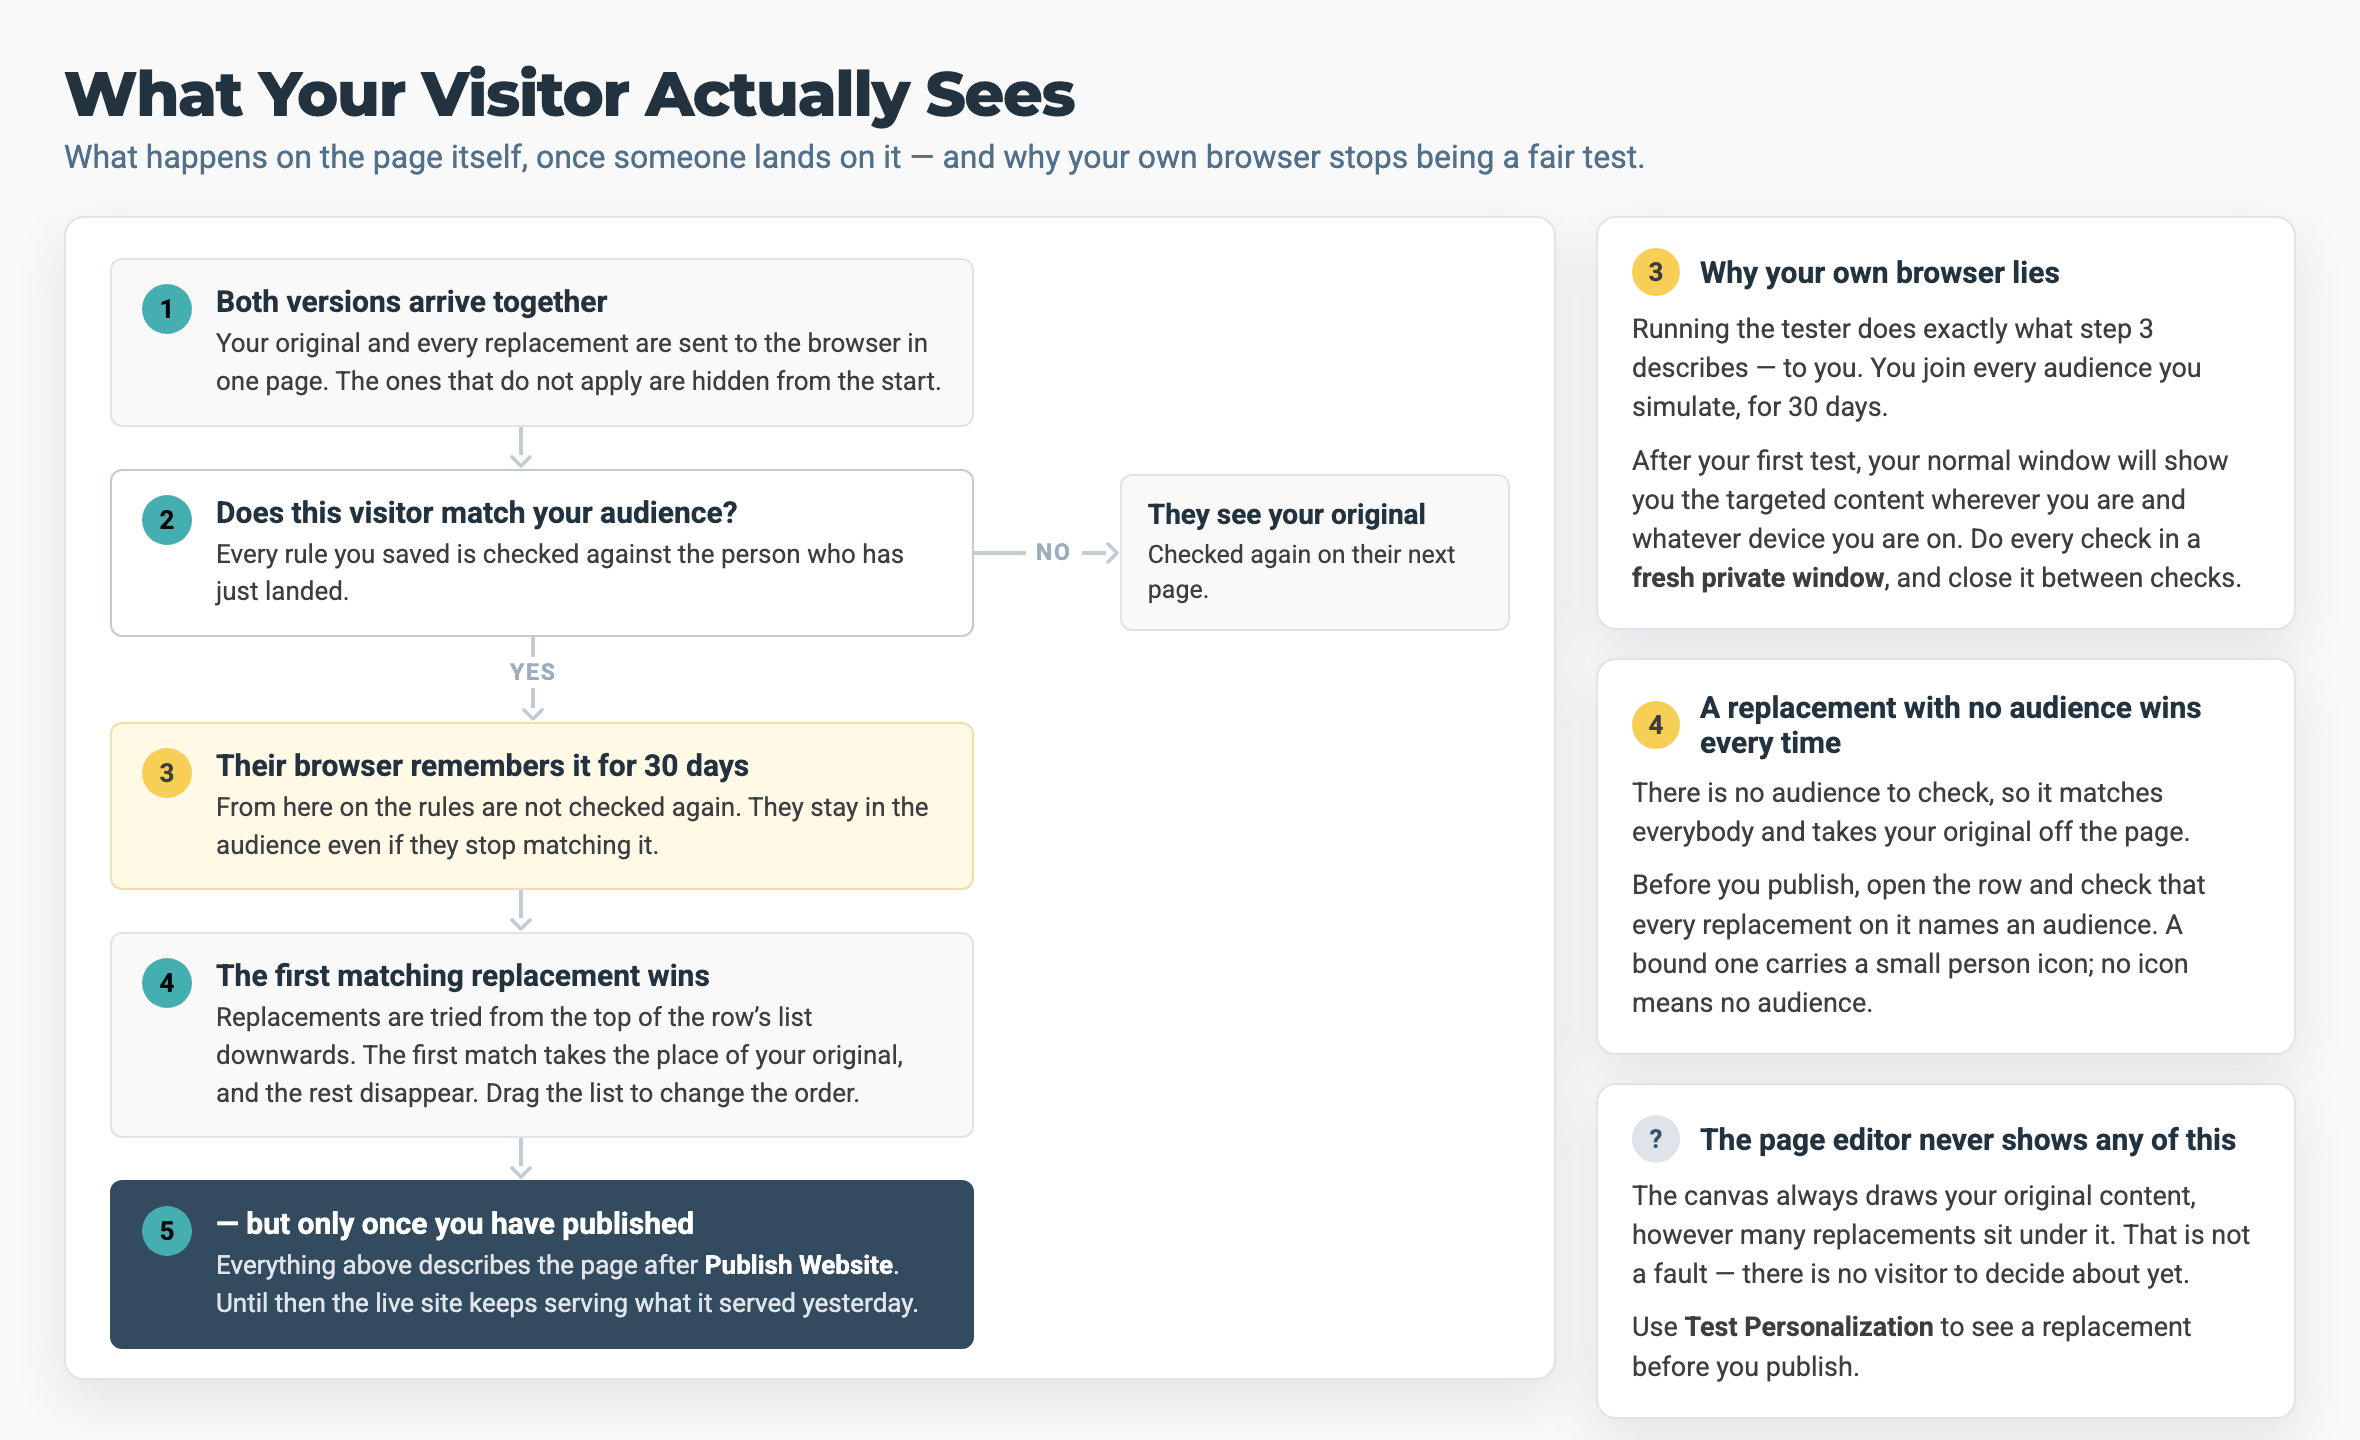
Read this first: testing puts you into the audience you tested.
When a visitor matches an audience, their browser remembers it for 30 days and keeps showing them that audience's content. The test tool does the same to your own browser: you join every audience you test.
This catches a lot of people out. After your first test, you cannot trust your normal browser window to check anything. Page Preview and the live site will both show you the audience's content, whatever device you are on and wherever you are.
Do every check in a fresh private (incognito) window, and close it between checks. A window you have already tested in will tell you the campaign works even when it does not.
Audit Your Setup Before Testing
Before you run a test, check that everything you built in Phase 2 is complete.
Path: Dashboard → Website CMS → [Domain] → Website → Personalization → Website Overview
- [ ] View Enabled Widgets: every widget you worked on in Phase 2 is in the list
- [ ] Website Overview: each widget has the right audience, and none was missed
- [ ] Website Overview: no two audiences overlap on a widget unless you planned it
Part 1 — Open the Test Personalization Tool
- Click Website → Personalization. The Audiences screen opens straight away. There is no separate Audiences link to click.
- On the Audiences screen, click [ TEST PERSONALIZATION ] in the row of buttons at the top.
The tool opens on its own screen. The Return to Audiences link takes you back. There is nothing to save, because each test is used once and then discarded.
The label
TEST PERSONALIZATIONappears twice. On the Audiences screen it opens the tool, which is this step. On the tool's own screen it runs the test, which is Part 4. Same name, two jobs.
Part 2 — Set the Test Location
Choose which page your test visitor lands on.
Preview or Live Website
Choices: Preview Website (already selected) or Live Website
What to choose: Choose Preview to test changes you have not published yet. Choose Live to test exactly what visitors see now.
Page
Choices: Every page on your site (Home, Rooms, Dining, …)
What to choose: Choose the page your personalised widget is on. This is usually Home.
Test on the page your personalised widget is on. An audience can match correctly and still show nothing if you land on a page with no content for it.
Part 3 — Describe Your Test Visitor
Fill in only the panels that match the rule types in the audience you are testing. Every field is optional, and an empty field is left out of the test.
Visitor City (already selected)
Fill this in to test…: City, State, Country and Distance rules
What to enter: Type a city name. The suggestions are listed as Country - Region - City. Pick the one whose country is the one you are testing. See the note below.
Visitor Latitude and Longitude
Fill this in to test…: The same location rules, more exactly
What to enter: Enter a latitude and longitude. The tool works out the city for you
Visitor Referring Website
Fill this in to test…: Referring Website rules
What to enter: Type a full web address, for example http://www.cntraveler.com
Visitor Campaign
Fill this in to test…: Campaign (tracking code) rules
What to enter: Pick a tracking code, or type one
Visitor URL Parameters
Fill this in to test…: URL Parameter rules
What to enter: One parameter=value per line
Visitor Cookie
Fill this in to test…: Cookie rules
What to enter: One cookieName=value per line
Visitor Language
Fill this in to test…: Language rules
What to enter: Select a language from the dropdown
Visitor Visited Pages
Fill this in to test…: Visited Pages rules
What to enter: Select a page and click [ Add Page ]. Repeat for more pages
Visitor Device Type
Fill this in to test…: Device Type rules
What to enter: Select Desktop, Tablet or Mobile
Visitor New/Returning
Fill this in to test…: New/Returning rules
What to enter: Select New or Returning
Visitor Delivered to Reservation System
Fill this in to test…: Delivered to Reservation System rules
What to enter: Select No or Yes
You can use either Visitor City or Visitor Latitude and Longitude, not both. Selecting one switches the other off.
Reading the city suggestions. Each suggestion is written
Country - Region - City. The same city name exists in several countries: typeNew Yorkand you are offeredUnited Kingdom - England - New YorkandJamaica - Parish of Saint Ann - New Yorkas well as the US ones. To test a Country rule, look at the first part of the suggestion and pick one that starts with the country you are testing, such asUnited States - …. The region and city do not matter for a Country rule. Any US suggestion matches a United States audience.
Part 4 — Run and Read the Result
- Click [ Test Personalization ]. The page opens in a new window, shown as your test visitor would see it.
- Check that the personalised content shows and the default content does not.
- To test another audience, change the fields and run the test again. Each test stands alone.
When your test visitor matches more than one audience. A widget item can hold several replacements, one for each audience, in its Personalization Replacements list. The first replacement from the top that matches is the one shown. No other setting decides it. To test one audience alone, fill in only the fields for its rule. To test an overlap, fill in the fields for both, and check that the higher replacement in the list is the one shown.
If you see another audience's content. A replacement higher up the list has matched first. Drag the replacements into the order you planned, most specific first, and test again. Then update your plan from Phase 1: Plan to match.
Testing the Six Use-Case Recipes
Each recipe in Personalisation Use Cases is tested with one panel. Set Page to the page the widget is on, which is Home for all six unless you placed it elsewhere. Then fill in only the field below.
1 — Partner Referral Win-Backs
Audience rule: Referring Website contains cntraveler.com
Field to fill in: Visitor Referring Website → http://www.cntraveler.com
2 — Event / Festival Referral
Audience rule: Referring Website contains galwayraces.com
Field to fill in: Visitor Referring Website → http://www.galwayraces.com. If the partner's link carries UTM tags, your audience uses a URL Parameter rule, so test it with Visitor URL Parameters. Visitor Campaign reads only a WT.mc_id code
3 — Group: hotel-first on return
Audience rule: Visited Pages equals [hotel page]
Field to fill in: Visitor Visited Pages → select the hotel's page → [ Add Page ]
4 — Country: US Visitors
Audience rule: Country equals United States
Field to fill in: Visitor City → type any US city, then click a suggestion that starts with United States -, such as United States - New York - Wayland. The rule reads only the country. The region and city make no difference.
5 — MICE / Meetings Upsell
Audience rule: Visited Pages equals [meetings page]
Field to fill in: Visitor Visited Pages → select the meetings or events page → [ Add Page ]
6 — Mobile-Exclusive (Method A)
Audience rule: Device Type equals Mobile
Field to fill in: Visitor Device Type → Mobile
Recipe 6, Method B cannot be tested here.
visible-xsandvisible-smare visibility classes, not audience rules, so this tool takes no notice of them. Test them with the Size selector or Get Mobile QR Code in Page Preview, as described in Part 5: Mobile Device Testing below. The classes themselves are covered in Phase 2 under Alternative — CSS Class Visibility.
Part 5 — Mobile Device Testing
The test tool can set Device Type, but it cannot show you how the page looks on a real phone. For that, use Get Mobile QR Code. You will find it in Page Preview. It is not on the Page Editor's own toolbar, and it is not on the page the test tool opens.
Use the test tool (Parts 1 to 4) for every other kind of rule, such as location, referring website, campaign and returning visitor. Use the QR code to check content for mobile visitors on a real phone.
- With the page open in the Page Editor, click Page Preview in the top bar. The preview opens with its own controls across the top.
- Set the Size selector to Mobile (360 × 640). The other options are Fullscreen, Tablet and a size you type in yourself.
- Click Get Mobile QR Code.
- Scan the QR code with your phone.
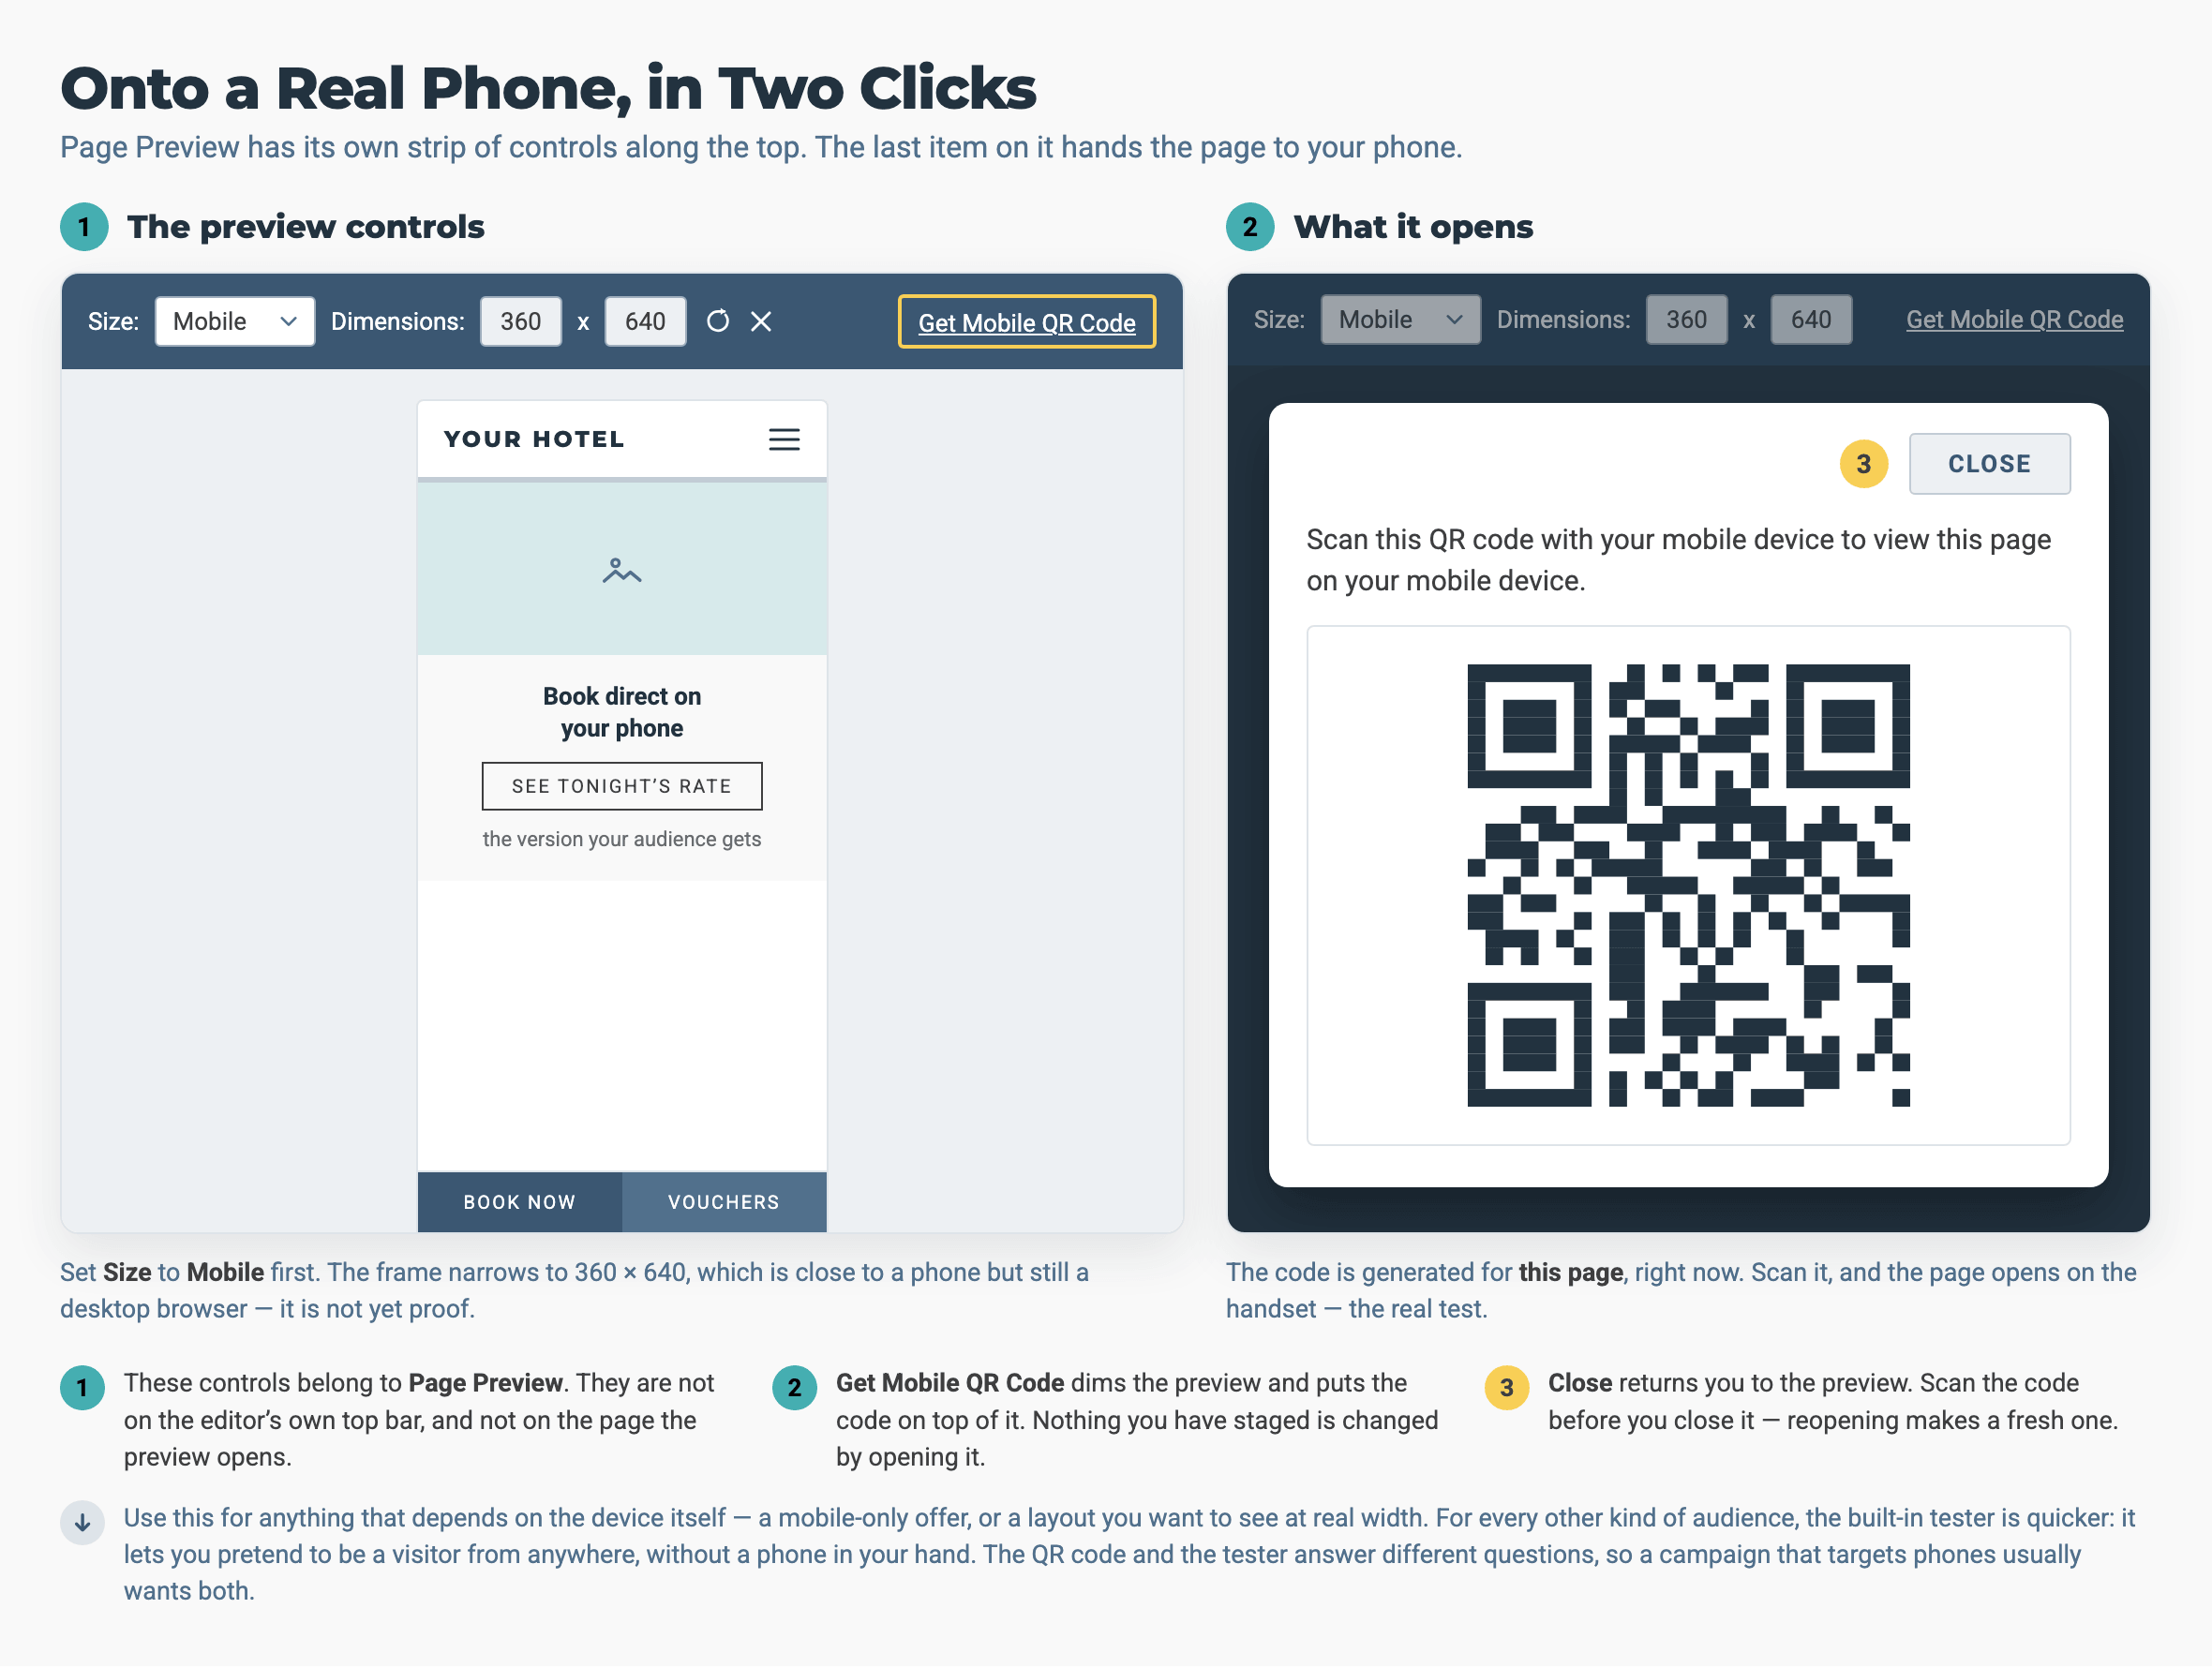
- Check that the content for mobile visitors appears and the desktop content does not.
[ PREVIEW WEBSITE ] on the Publish screen opens the same controls, so you can reach the QR code from there too. That preview starts on your site's entry page, not on the page you were editing.
Check the layout on a real device. Themes are built in different ways, so a widget can look right on a desktop and wrong on a phone. Do not rely on the desktop preview alone. If you added a visibility class such as
visible-xsin Phase 2, check that the widget is laid out correctly on a phone as well as shown to the right audience.
Troubleshooting
The test window shows the default content, not the personalised content
Cause: The panel for the audience's rule was left empty, or a different panel was filled in
Fix: Go back to Part 3 and fill in the panel that matches the audience's rule type
The audience is right, but nothing changes on the page
Cause: The test opened a page with no content for that audience
Fix: Set Page to the page the widget is on, usually Home
Another audience's content appears
Cause: Your test visitor also matches another audience on the same widget item
Fix: Fill in only the fields for the audience you are testing, and add the overlap to your plan
A Country rule does not match
Cause: You picked a suggestion from the wrong country, such as United Kingdom - England - New York when you wanted a US one
Fix: Pick a suggestion whose first part is the country you are testing, such as United States - …. Country has no field of its own. You test it through Visitor City or Visitor Latitude and Longitude (Part 3).
A test does not show a widget that uses visible-xs
Cause: Visibility classes are not audience rules, so the test tool takes no notice of them
Fix: Use the Size selector or the QR code in Page Preview. See Part 5: Mobile Device Testing above
→ Next: Phase 4: Publish & Monitor, where you put your work live and see what you can measure.
Related: Personalisation Use Cases, the six recipes tested above.
Want help with your personalisation?
Our team can help you plan and carry out your personalisation goals — choosing the visitors worth treating differently, deciding what each of them should see, and building, testing and publishing the campaign with you.
Email support@bookassist.com and tell us what you want to achieve — more direct bookings from returning guests, a seasonal offer for one market, or anything else you have in mind.