
Read this first: a form saves without any warning when it has no recipient address at all, and then it notifies nobody. If enquiries have stopped arriving, check step 2 first.
Step-by-Step Instructions
Every successful submission sends two emails, from two separate templates:
Goes to
Property Email: the hotel
Guest Email: the person who filled the form in
Where the address is set
Property Email: To Email Addresses
Guest Email: Reply To Email Address
What it usually contains
Property Email: the answers, plus a link back to the submission
Guest Email: a thank-you and a reference number
Both are on the EMAIL TEMPLATES tab of the form. Open it from the dashboard with MANAGE ▾ → Manage, then click EMAIL TEMPLATES.
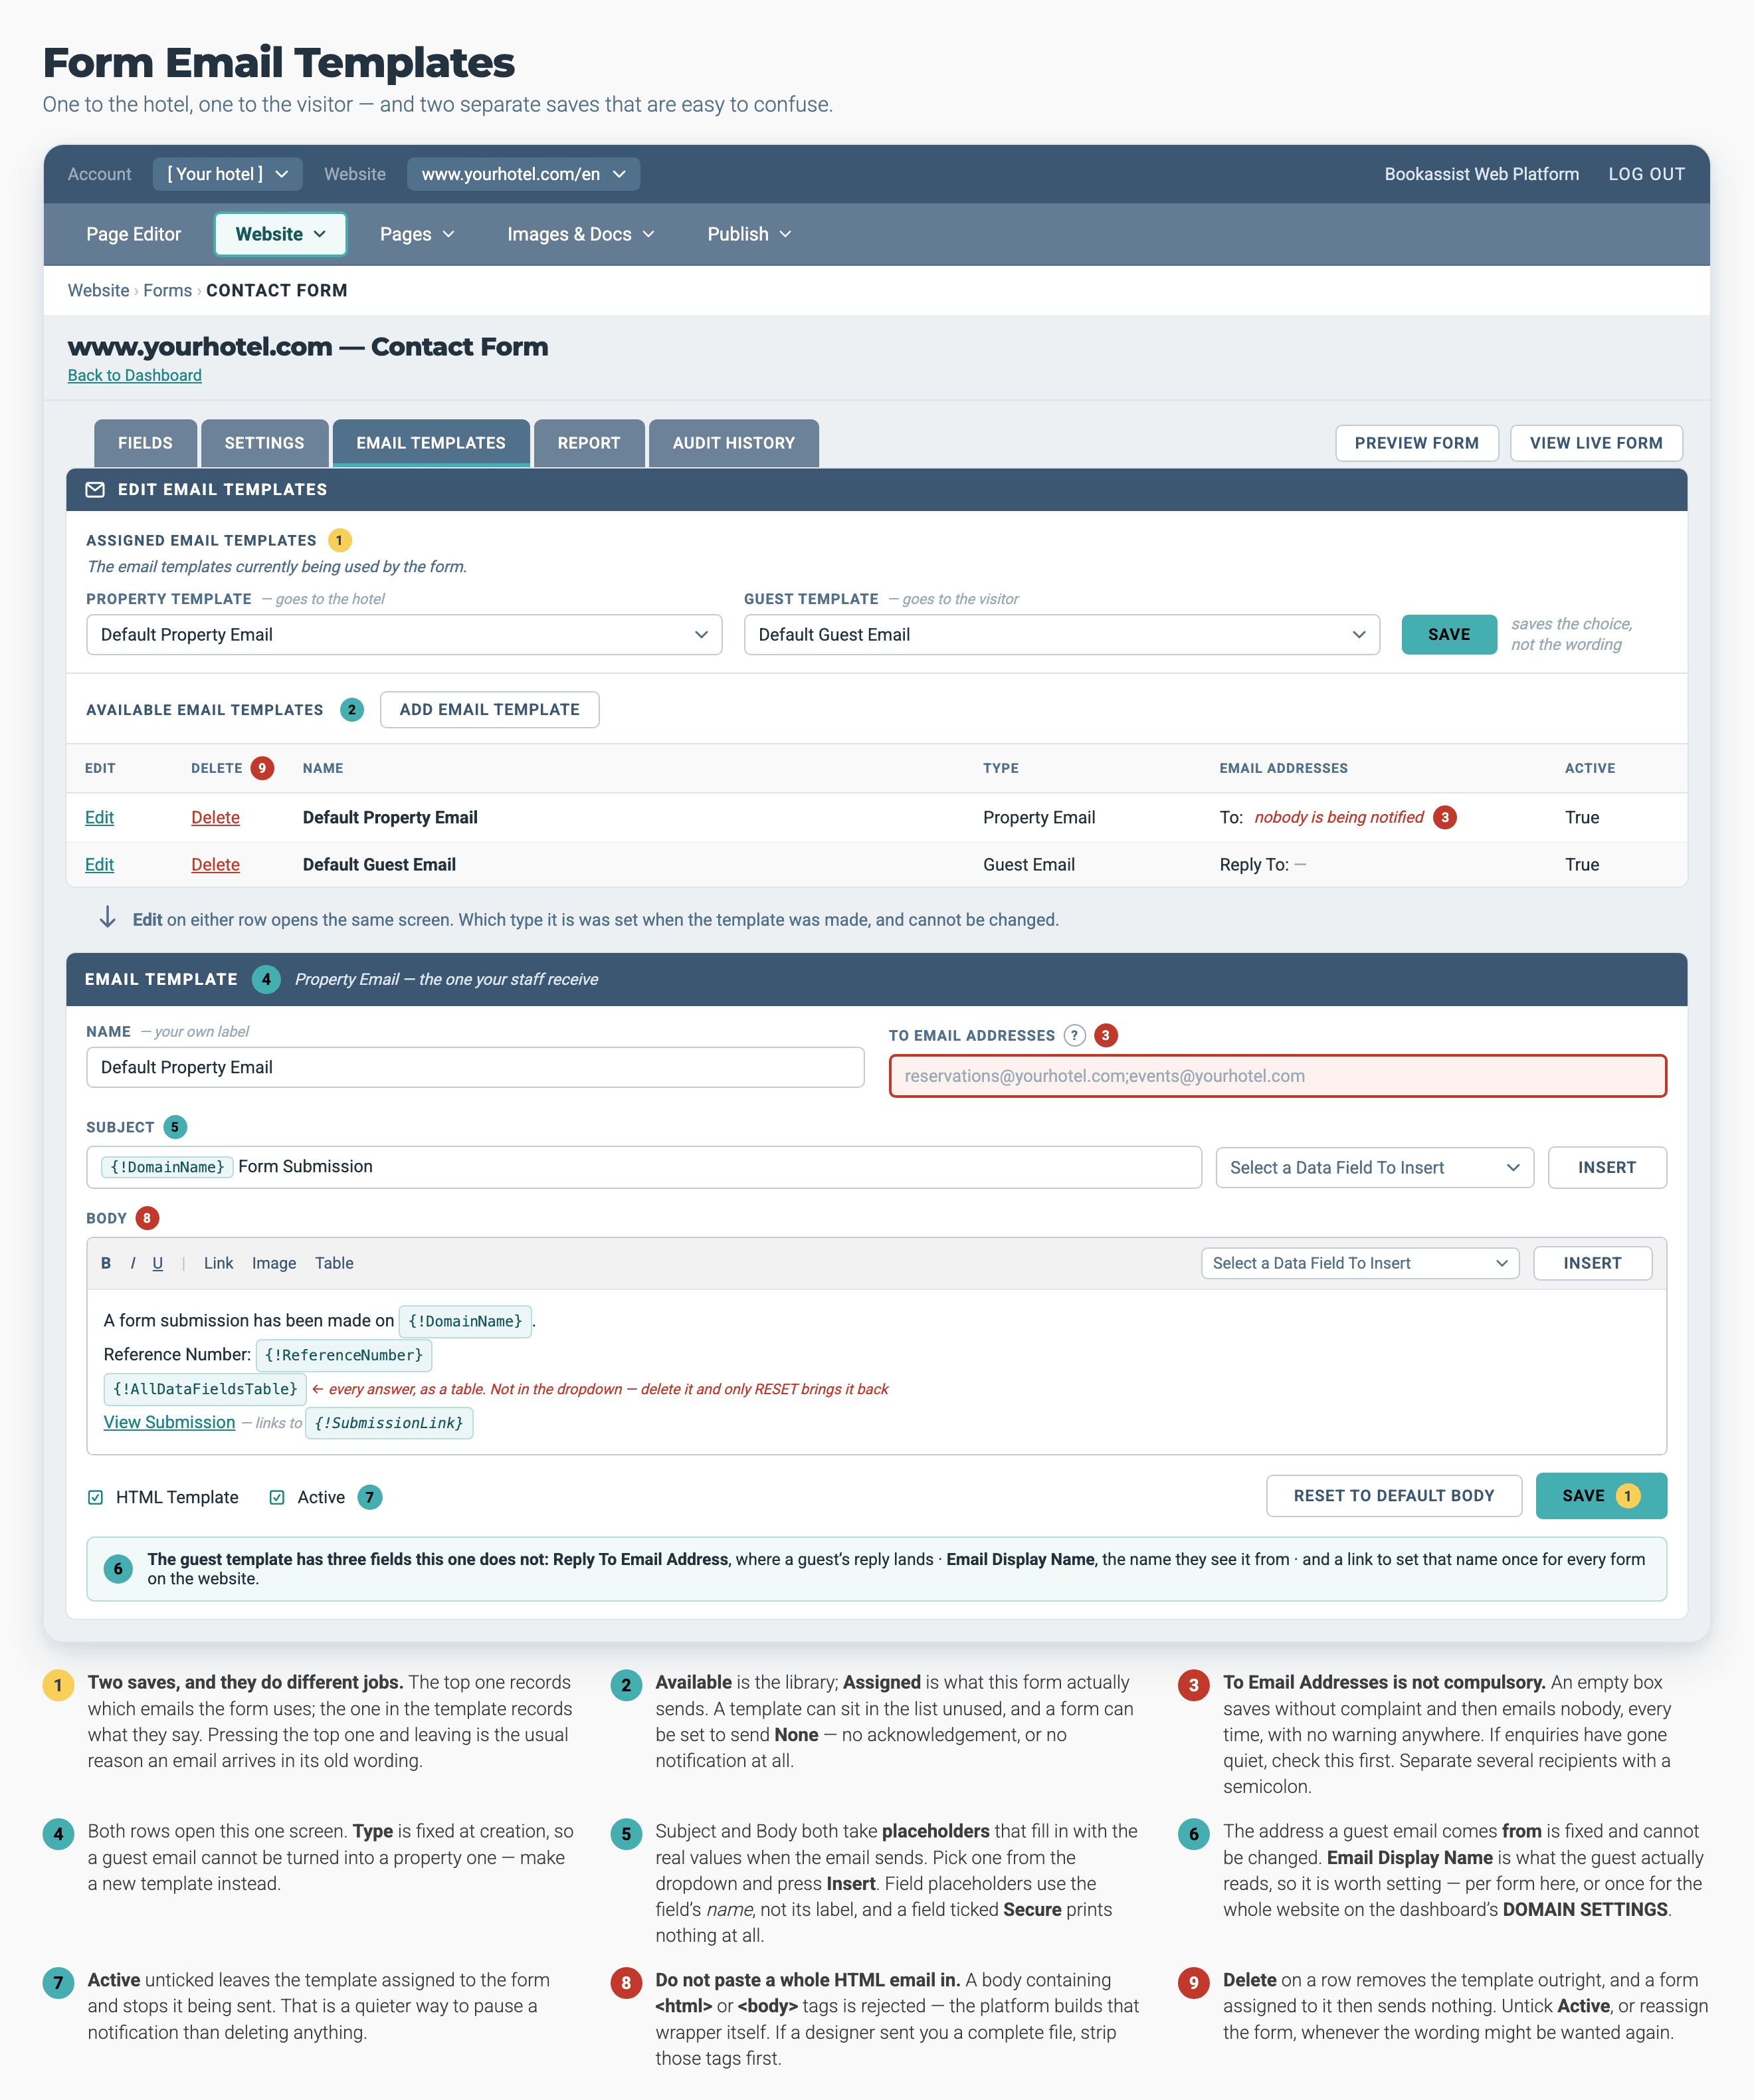
Both Saves are on this one tab, one above the other. The top one records which emails the form uses; the bottom one changes what they say. If an email still arrives in its old wording, the usual reason is that only the top one was pressed.
1. Choose Which Templates the Form Uses
The top of the tab, Assigned Email Templates, has one dropdown for the property email and one for the guest email.
- Pick the property template the form should send.
- Pick the guest template.
- Click SAVE.
Caution
Assigning a template and editing a template are two different saves. This section picks which template the form uses. Changing the wording happens further down the page and has its own SAVE. Saving one does not save the other, and neither reminds you about the other. This is the usual cause of "I changed the email and staff still got the old one."
2. Set Who at the Hotel Gets the Enquiry
- Find the property template in the Available Email Templates list and click Edit.
- Fill in To Email Addresses. For more than one recipient, separate the addresses with a semicolon.
- Click SAVE.
Caution
This field is not required. The template checks that anything you type looks like an email address, but it also accepts an empty box. A property template with no recipient saves normally and then emails nobody. Set it on every form, and check it whenever the person who handles an enquiry changes.
3. Write the Property Email
Still on the property template:
- Name
-
A label for your own use, such as
Wedding enquiry to events team - Subject
- What staff see in their inbox. Say which form it came from
- Body
- The email itself, in a rich text editor
- Active
- Leave ticked. An inactive template stays assigned to the form but is never sent
The default body already contains the reference number, a table of everything the visitor typed, and a View Submission link back into the platform. Most properties only need to change the greeting around it.
Click SAVE.
Caution
Do not paste a complete HTML email in. A body containing or tags is rejected, because the platform adds those tags itself. If a designer has sent you a full email file, remove those tags before you paste it.
4. Set Up the Guest Acknowledgement
Click Edit on the guest template. It has the same Name, Subject, Body and Active fields, plus two of its own:
- Reply To Email Address — the address a guest's reply goes to. Use the address of whoever handles that type of enquiry.
- Email Display Name — the sender name a guest sees, for this form only.
The address a guest email is sent from is fixed by the platform and cannot be changed. The display name is what a guest actually reads, so it is worth setting.
To set one display name for every form on the website at once, use DOMAIN SETTINGS on the Forms dashboard. It has a single field, and each form's own Email Display Name overrides it.
Click SAVE.
5. Put the Visitor's Answers Into an Email
Both the Subject and the Body accept placeholders that are replaced with the real values when the email is sent. Use the dropdown above the field and click Insert to add one.
-
{!DomainName} - Your website's domain
-
{!FormName} - The name of the form
-
{!ReferenceNumber} - The submission's reference number
-
{!SubmissionLink} - A link back to the full submission
-
{!TodayLong}·{!TodayShort} - Today's date, long or short
The form's own fields are placeholders too, so each form has its own set: a wedding form offers different ones from a newsletter sign-up. They use the field name, not the label. A field labelled Phone whose field name is Phone becomes {!Phone}. The built-in fields are lower case, so First Name is {!firstname}.
Two placeholders behave differently from the rest:
{!AllDataFieldsTable}prints every answer as a table. It is already in both default bodies and it works, but it is not in the dropdown. If you delete it, the only way to get it back is RESET TO DEFAULT BODY, which replaces the whole body.- A field you ticked Secure on prints nothing at all. Secure answers never reach an email; read them from the report instead.
6. Route Enquiries to Different Departments
One form can email different people depending on what the visitor chose.
- Open the field the visitor chooses from, with Edit on the FIELDS tab. It has to be a Drop Down, a Radio Button List or a Check Box List.
- Tick Dynamic email notification. It appears only on those three field types.
- Click SAVE.
The notification then goes to the contact for the option the visitor chose. A single Event Enquiry form with a Type of event dropdown can then send weddings to the wedding coordinator and conferences to the meetings team, so you do not need a separate form for each.
Pro-Tips & Troubleshooting
- "Staff are not getting emails at all." Check To Email Addresses on the property template first. An empty box is the most common cause, and it produces no error.
- "I changed the wording and the old email still arrives." You edited one template, but the form uses another. Check the dropdowns at the top of the tab.
- "Only some staff get it." Multiple addresses need a semicolon between them.
- "A field is missing from the email." If it is a Secure field, that is how Secure works. Otherwise check that the placeholder matches the field name, which is not always the label.
- "The View Submission link goes nowhere." That link needs the submission to be stored. It stops working on any form with Do Not Store Form Submissions ticked. See How to Read Form Submissions.
- Test before you rely on it. Submit the form yourself and confirm both emails arrive before guests see the page.
→ Next: How to Read Form Submissions — finding, filtering and exporting what came in
Related: How to Manage Website Forms — creating the form and its fields · How to Set Up RFP Forms — the wedding, meetings and golf enquiry forms