
Read this first: a widget with rows cannot be built in one go. You fill in the top of the panel, click Save, and only then can you add rows. This catches everyone out on their first widget.
Step-by-Step Instructions
Most widgets are built in layers: the widget itself, then rows inside it, then buttons or images inside those. Call to Action 1.0 has all of these layers, so it is the example used here. Feature List, CTA Carousel, Hero Carousel, Columns and Split Layout work the same way, with different names for the rows.
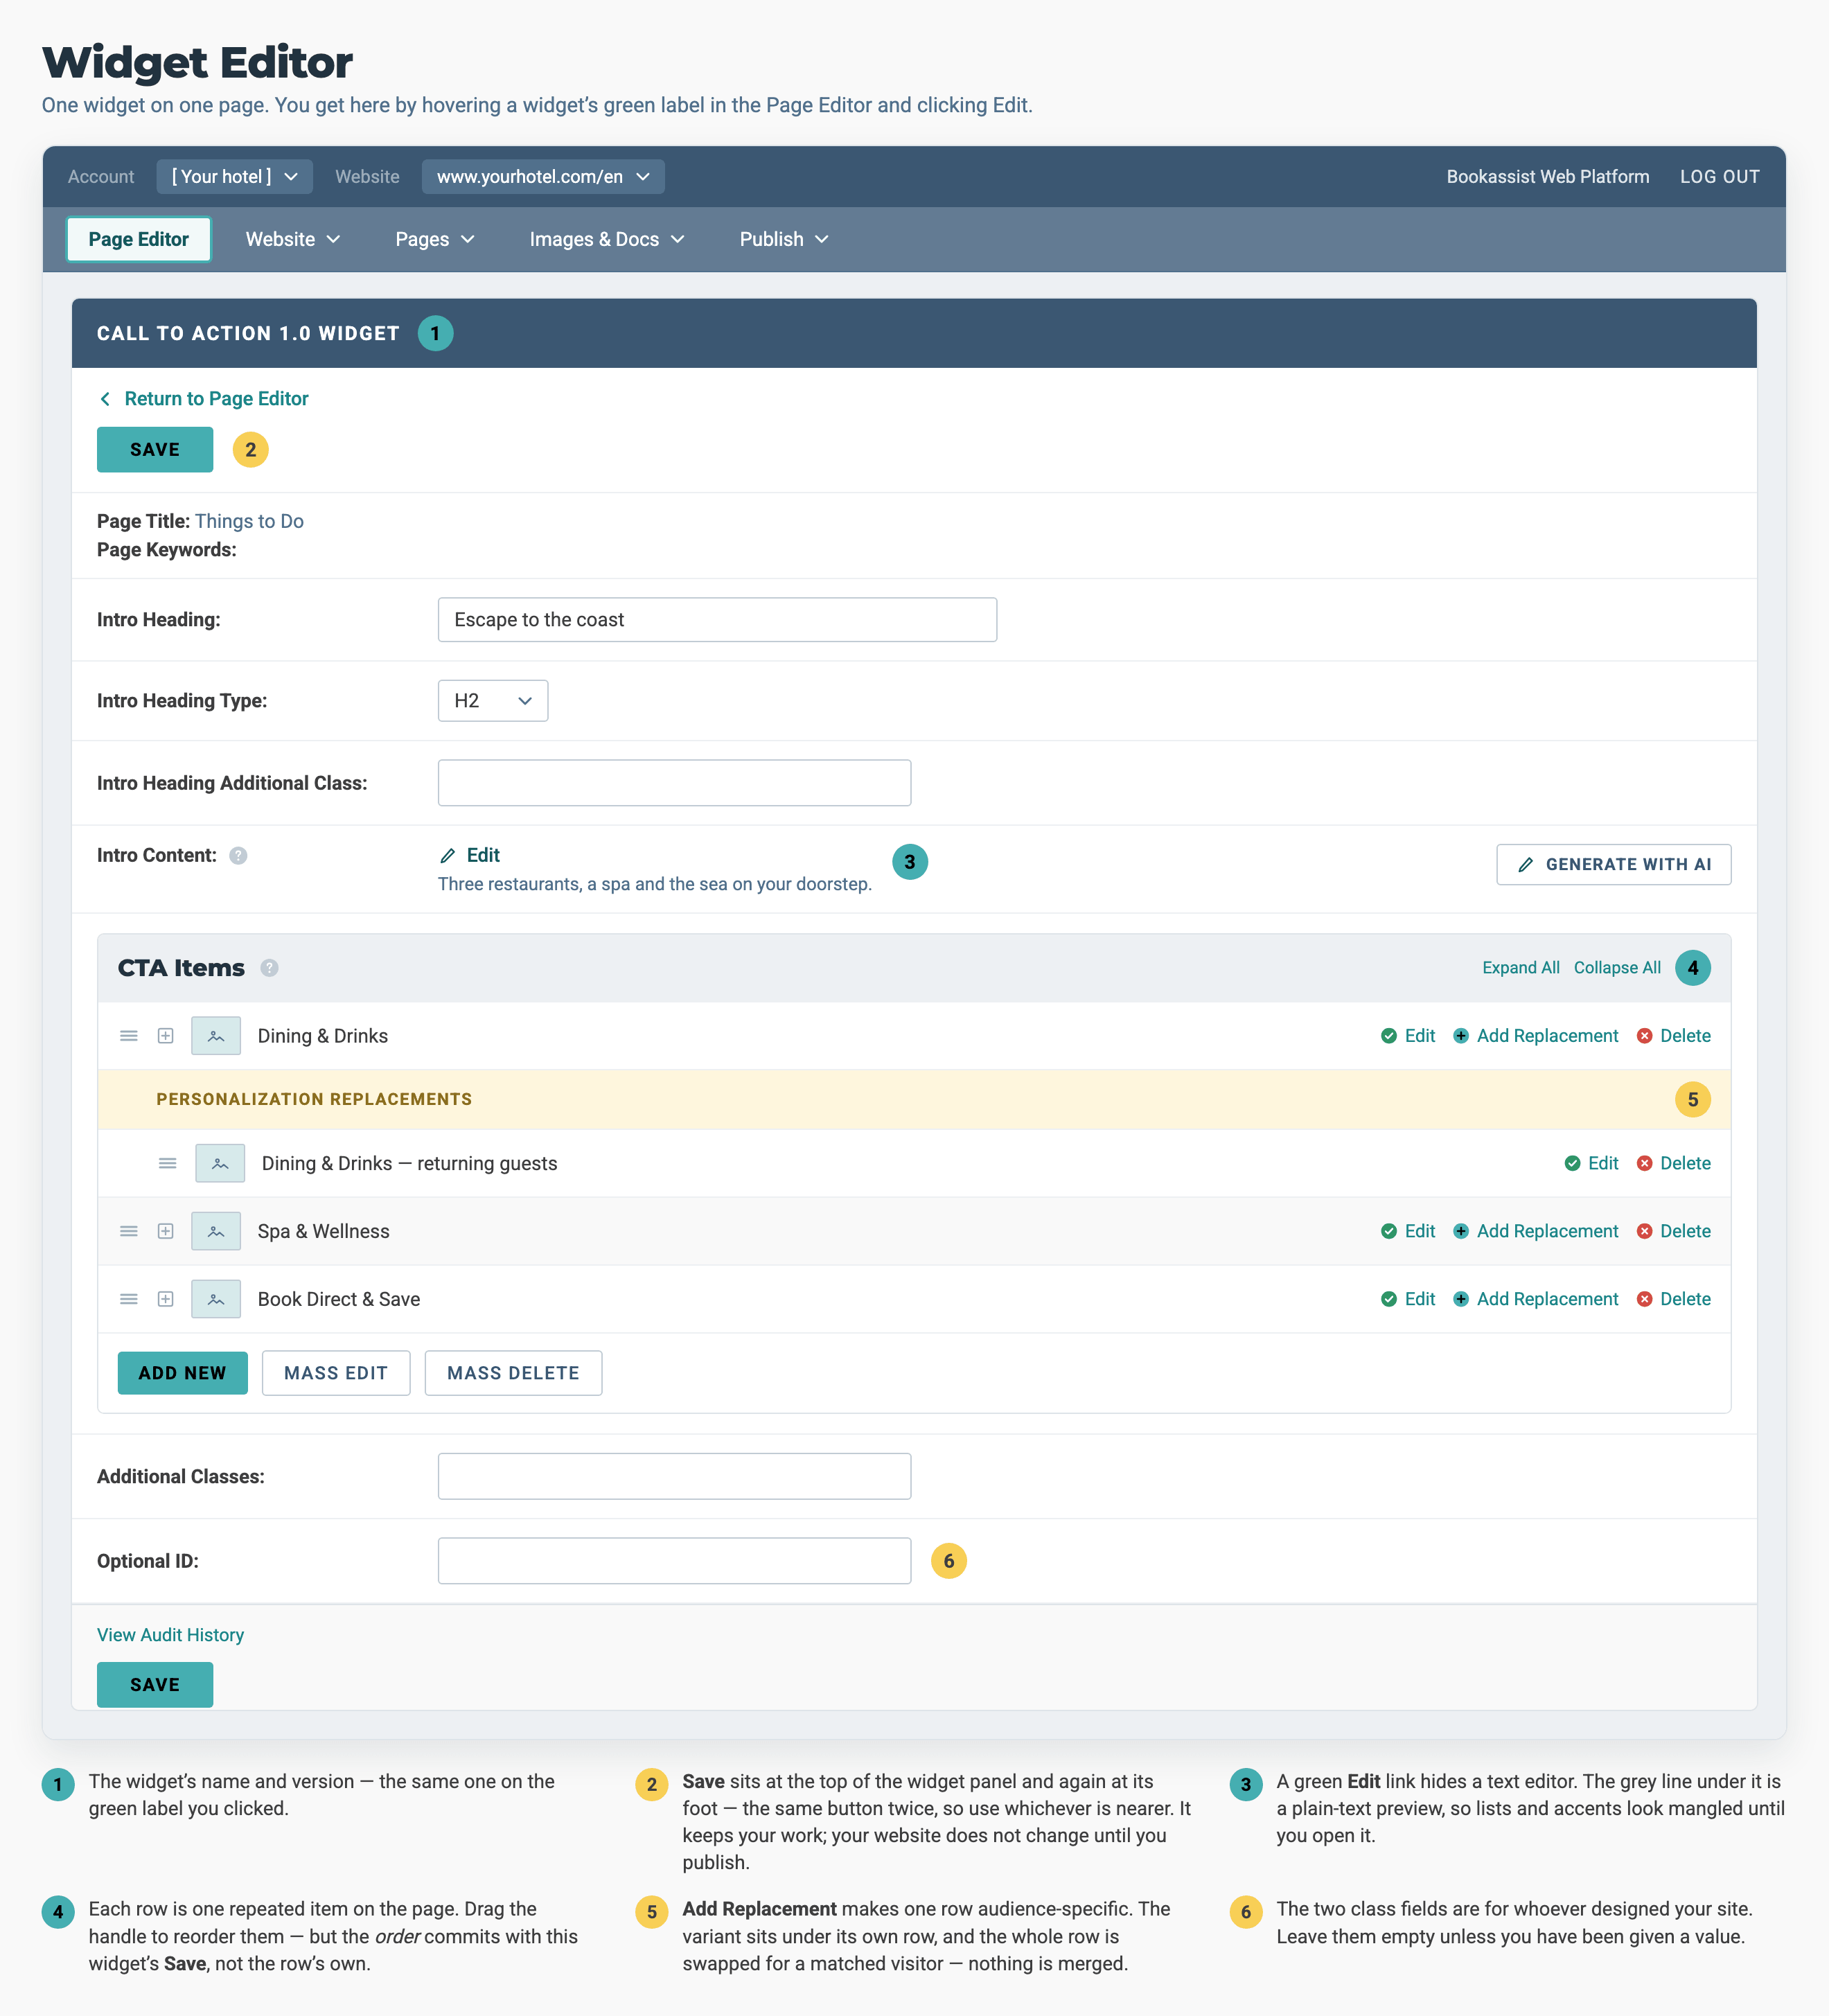
The widget's own fields are at the top of the panel, and its rows are the list underneath. Save appears at the top and again at the bottom. Both do the same thing, so use whichever is nearer.
1. Fill In the Widget's Own Fields
- Open the Editor: Hover the green widget label at the widget's top-left, then click Edit. If the label is behind another one or under the top bar, see How to Find a Widget You Cannot Click.
- Set the Section Heading: Intro Heading is the heading shown above everything else in the widget. Leave it empty if the page already has a heading that says the same thing.
- Choose the Heading Type: This sets the heading's level, H1 to H6. The level is about the page's structure, not the text size. A page needs one H1, with the other levels in order below it.
- Add Intro Text: Intro Content is a rich text box for a short paragraph under the heading. Do not put a second heading in this box.
- Skip the Rest: Additional Classes and Optional ID are for a designer. Leave them empty unless you have been given a value to enter.
2. Save Once to Turn On the Rows
- Look at the list of rows: On this widget it is called CTA Items. On a new widget the list has a heading but no rows and no ADD NEW button. Instead there is one line of text saying items can be added after saving.
- Click Save: This switches the rows on.
- Result: The ADD NEW button appears.
- ⚠️ If a required field stops you saving, type anything into it, save, then come back and correct it. The rows will not appear until the widget has been saved once.
3. Add Each Row
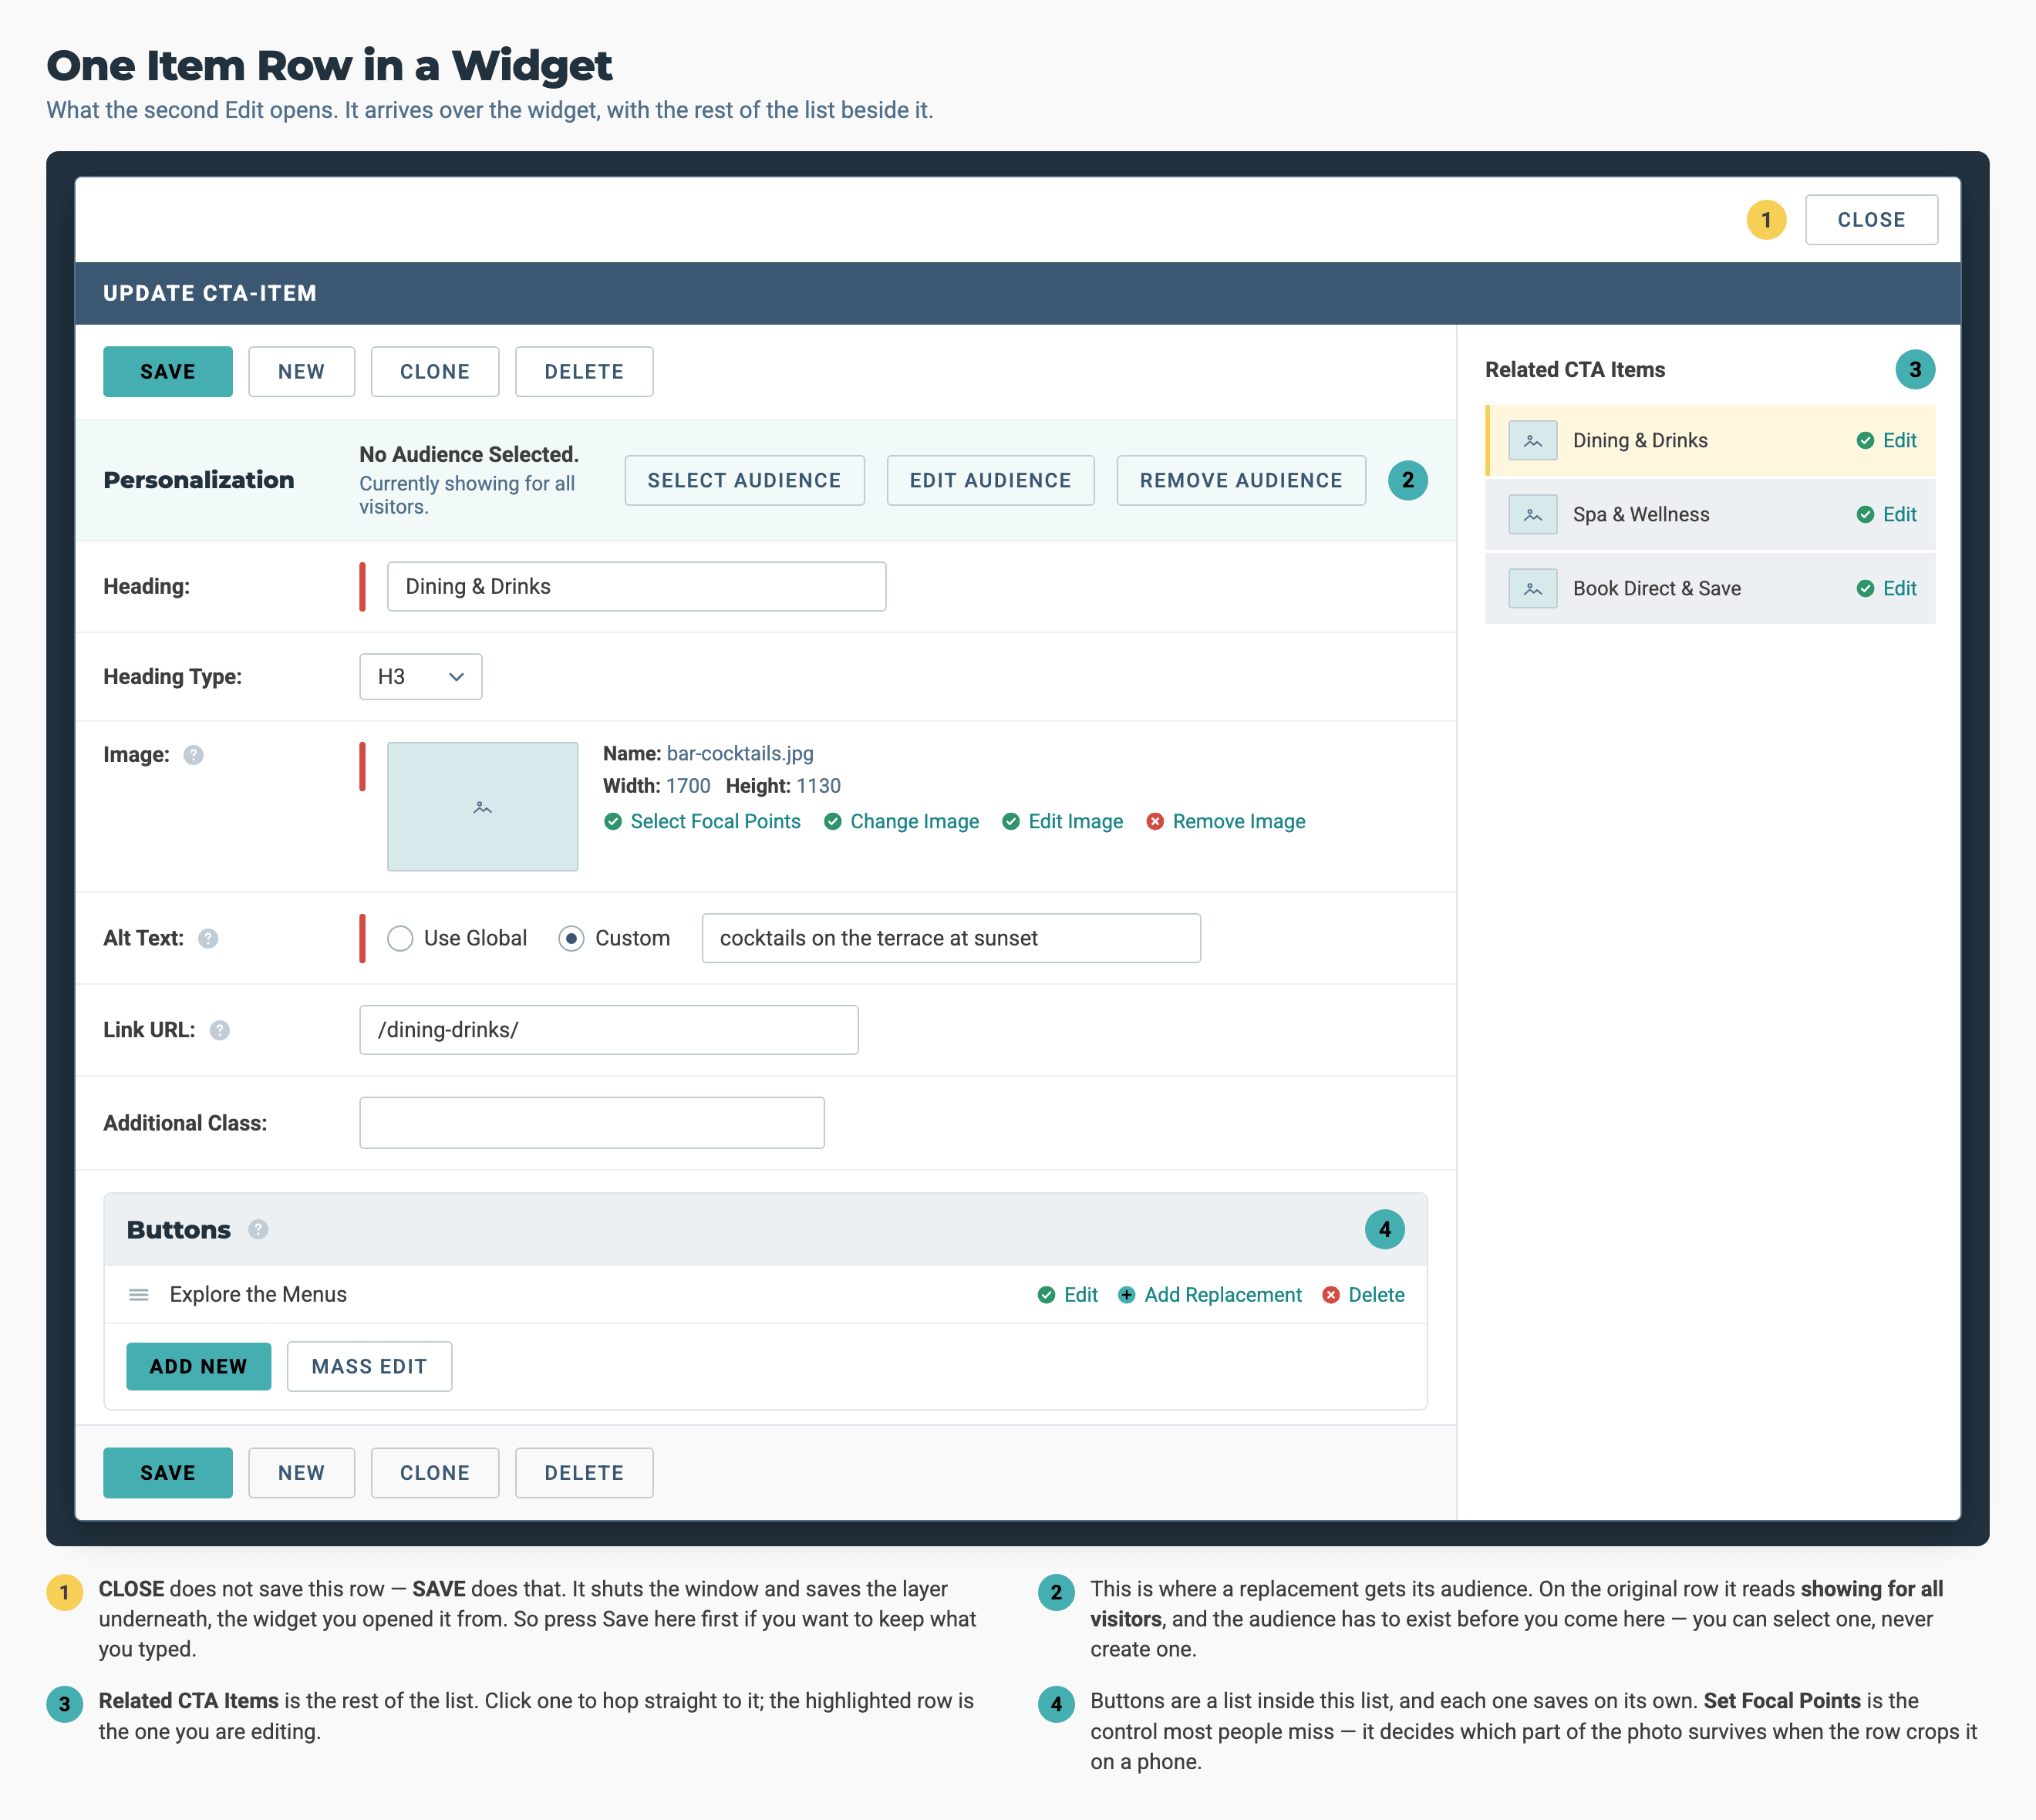
One row's form. Save, New, Clone and Delete appear above the fields and again below them. The list on the right takes you straight to another row.
- Click ADD NEW: A form opens for one row.
- Fill It In: Give the row a heading, a heading type and the text or link it needs. The heading type is usually one level below the widget's own.
- Click Save on the Row: Each row saves on its own.
- Repeat: One ADD NEW per row.
- A row form has Save, New, Clone and Delete, and no Cancel. New saves this row and opens a blank one, which is the quickest way to add several rows.
- ⚠️ Closing the window is not a cancel. It discards this row's unsaved fields, so click Save first if you want to keep them. It also saves the widget panel behind the row. If you were part-way through changing the widget's own fields, closing a row saves those changes too. Finish one level before you open the next.
4. Add a Button Inside a Row
Buttons belong to a row, not to the widget.
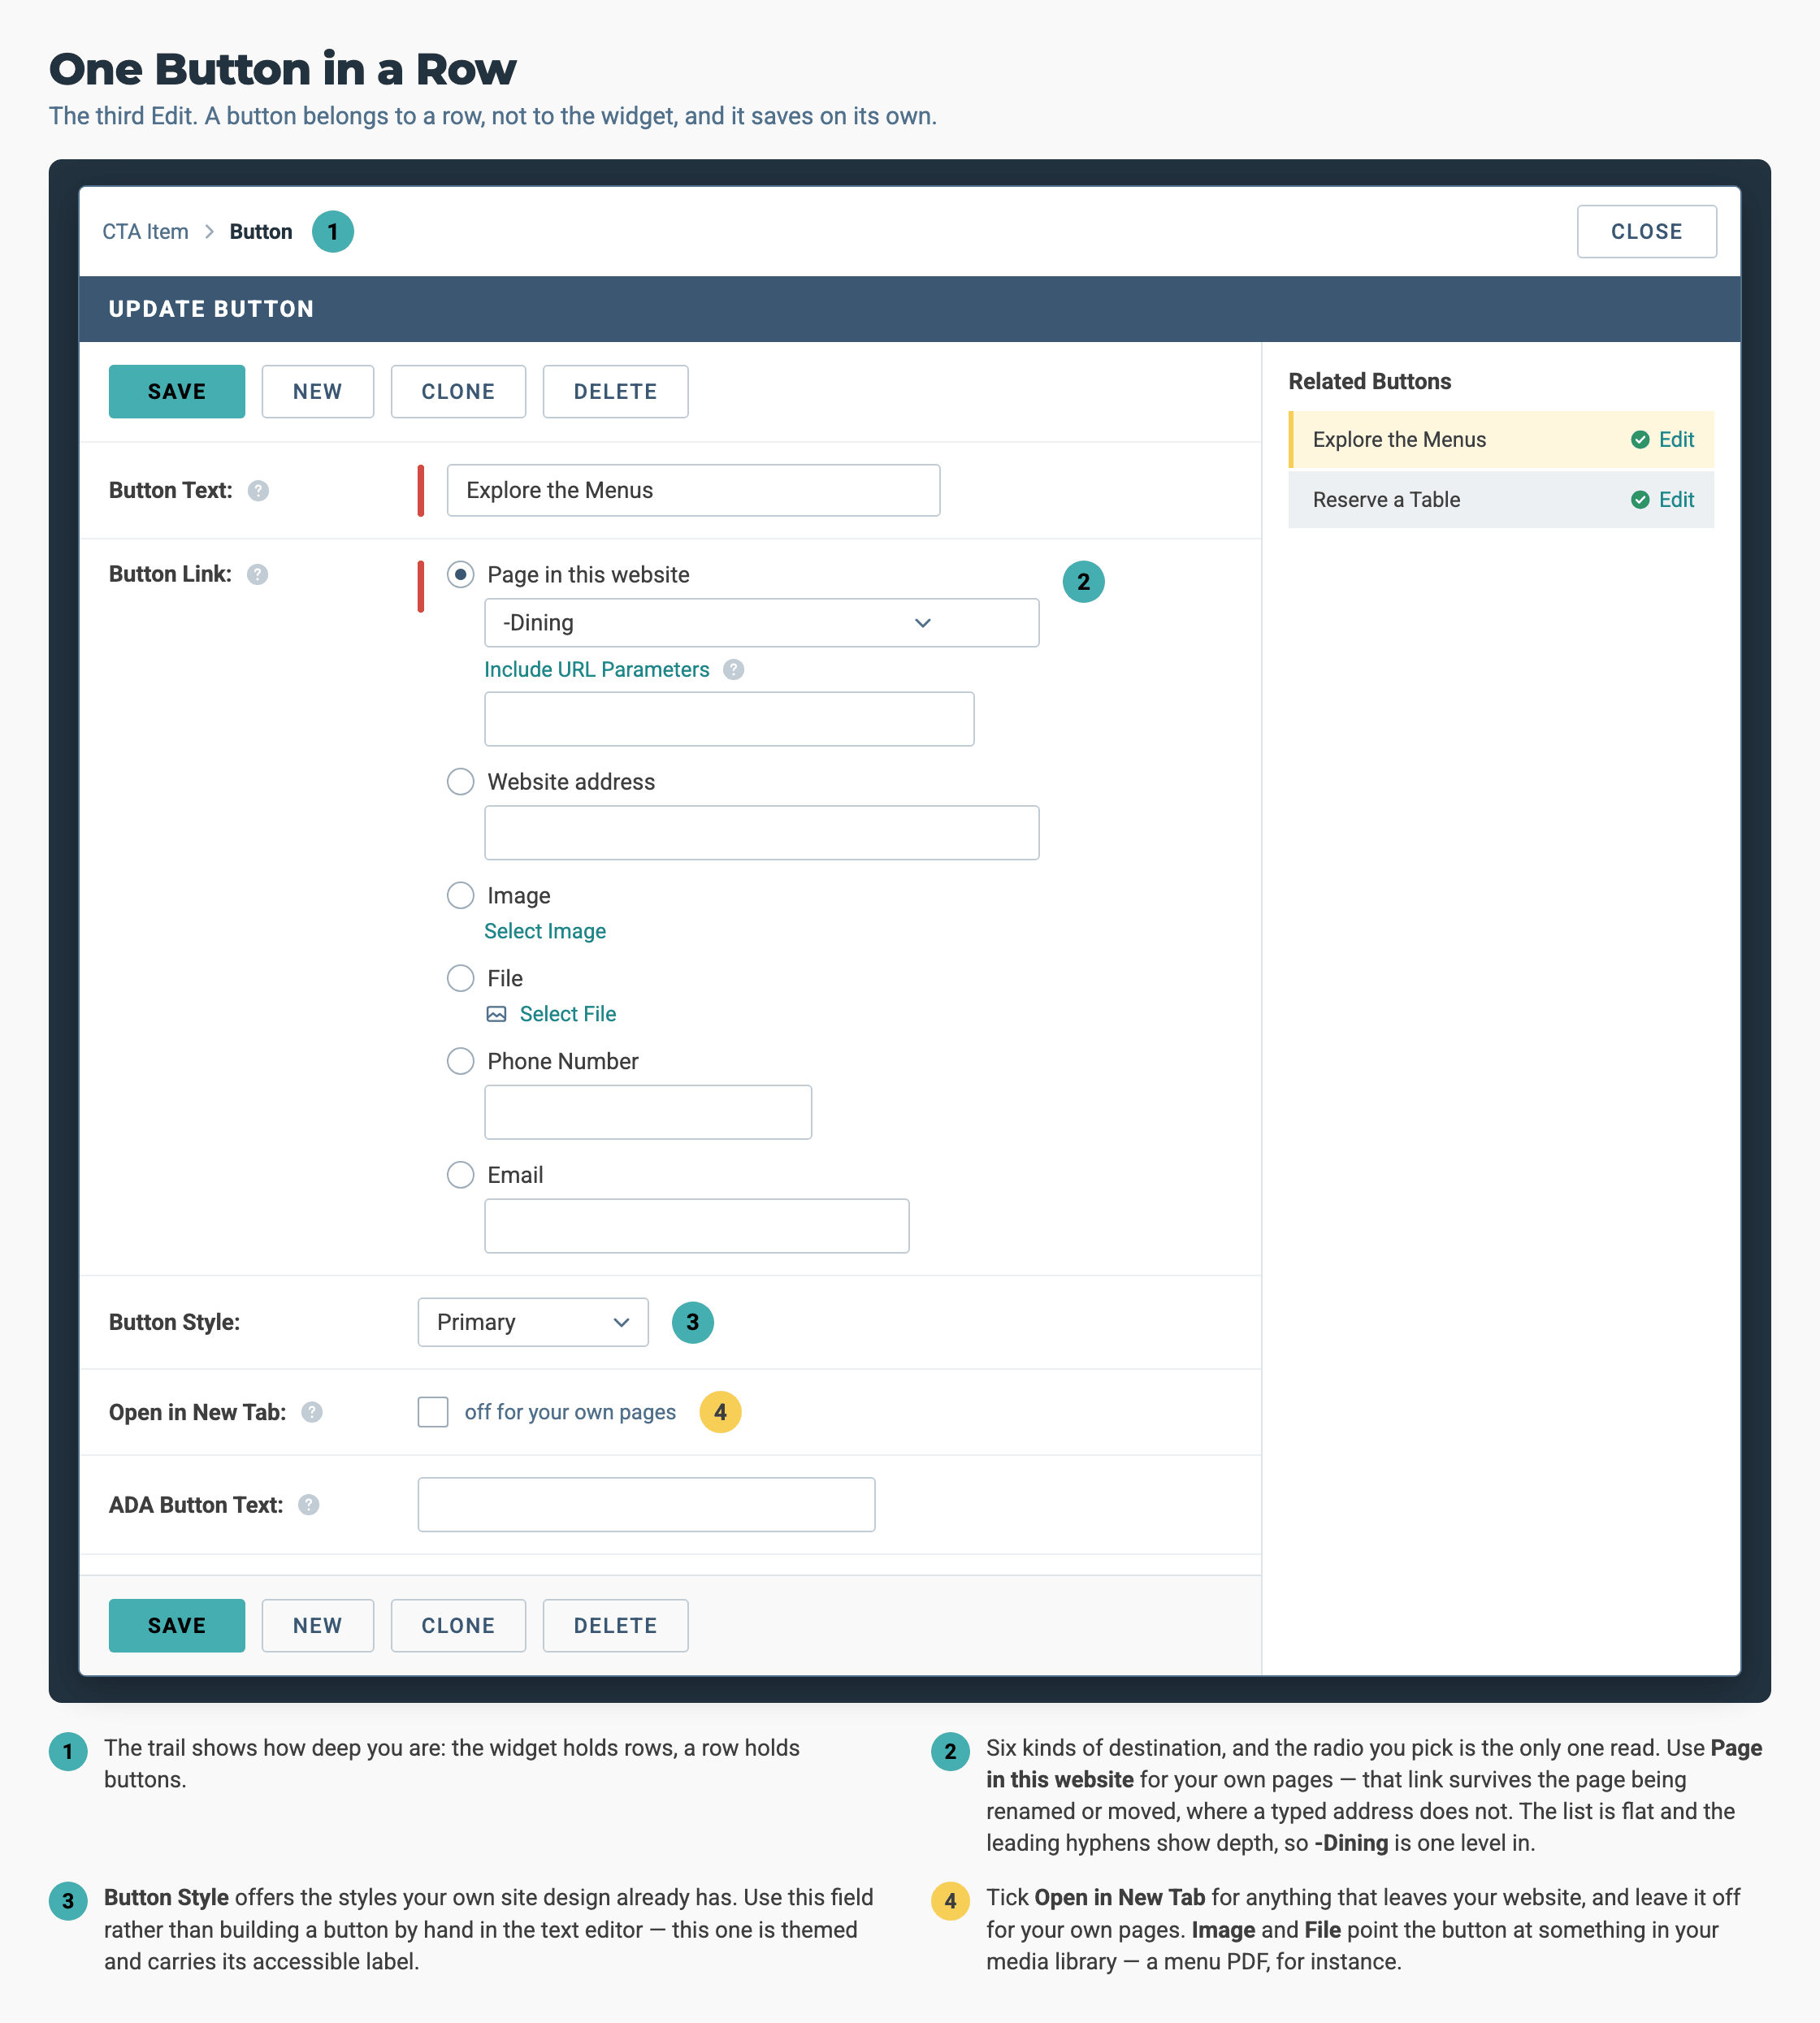
One button's form. Button Link offers six kinds of destination and uses only the one you tick.
- Open the Row: Hover it and click Edit.
- Click ADD NEW under Buttons.
- Set the Text: Button Text is what the visitor reads.
- Choose Where It Goes: Button Link offers six kinds of destination, and only the one you tick is used. Pick Page in this website for your own pages. That link keeps working if the page is later renamed or moved, and a typed address would break. Website address is for anywhere else. Image and File link to something in your media library, such as a menu PDF. Phone Number and Email make the button start a call or an email.
- Pick a Style: Button Style lists the button styles in your site's design.
- Tick Open in New Tab for anything that leaves your site. Leave it off for your own pages.
- Save the button, then save the row.
Use this form instead of making a button by hand in a text box. The button field styles the button to match your site and labels it for screen readers. A hand-made button gets neither, and it will look wrong the next time the site's design changes.
5. Set the Image and Its Focal Point
- Click the Image Field: The image picker opens. It is the same one you get from Images & Docs. Browse folders, search, upload, or pick a stock photograph.
- Choose the Image.
- Click Select Focal Points: Then click the part of the picture that must always stay visible.
- ⚠️ Do not skip this. The picture is cropped on narrow screens. Without a focal point it is cropped around the centre, which cuts the tops off buildings and the main subject out of food photographs.
- Choose the Alt Text: Use Global uses the description stored with the file itself, and it is nearly always the right choice. Pick Custom only when this picture means something different here from what it means elsewhere on the site.
6. Put the Rows in Order, Then Save the Widget Again
- Drag the Rows: Use the handle at the left of each row.
- Click Save on the Widget Panel.
- ⚠️ This is the step people miss. A row's content is saved on the row, but the order of the rows is saved on the widget. If you reorder the rows and close the widget without saving it, you keep your edits and lose the order, and no error is shown.
7. Publish
- Preview: Use Page Preview to check the result.
- Publish: Everything above is staged until you do. See How to Publish Your Site.
Which Save Commits What
| You changed | It is saved when you save |
|---|---|
| The heading, intro text, classes or ID | The widget panel |
| A row's content | That row |
| A button's text, address or style | That button |
| The order of the rows | The widget panel |
| Nothing. You only closed a row | ⚠️ Closing a row saves the widget panel behind it |
| Anything at all, for visitors | Publish |
Making One Row Audience-Specific
If your site uses audiences, Add Replacement on a row replaces that whole row with a different version when a visitor matches an audience.
- Build the audience first. The replacement form only lets you pick an audience that already exists. It cannot create one.
- Hover the row and click Add Replacement.
- Pick the audience, then fill in the replacement. It has its own heading, image, link and buttons. It does not copy them from the original row.
- Result: Replacements appear under the original row, grouped under a Personalization Replacements heading.
Full walkthrough: How to Set Up Personalisation.
Pro-Tips & Troubleshooting
- No ADD NEW button under the rows. The widget has never been saved. Save it.
- The rows went back to the old order. The order is saved with the widget panel, not with the row. Drag them again and save the panel.
- The image crops badly on a phone. No focal point was set, so the image is cropped around the centre. Open the image field and click Select Focal Points.
- Changing the alt text changed it everywhere. Use Global was selected, and that description is stored with the file. Switch to Custom to change it here only.
- The button looks unstyled. It was built in a text box instead of the Buttons field. Rebuild it there.
- The whole row is clickable and so is the button. A row's Link URL makes the whole row clickable, and a button adds a second link. Send both to the same place, or leave the row's link empty.
- You want the same widget somewhere else. Do not rebuild it. If Clone is on the widget label, use it. If it is not there, your account does not have permission for it. Ask the person who manages your website.
→ Next: How to Publish Your Site — publish the finished widget