
Every content field uses the same editor. This guide covers headings, paragraphs, lists, links, PDF menus and pictures inside the text.
One rule explains everything below: the widget does the design, the editor does the content. The editor holds your words as HTML and has no design of its own. The widget around it shows those words in your website's layout. Almost every problem with the editor comes from trying to build a layout in it, when a widget field already does that job properly.
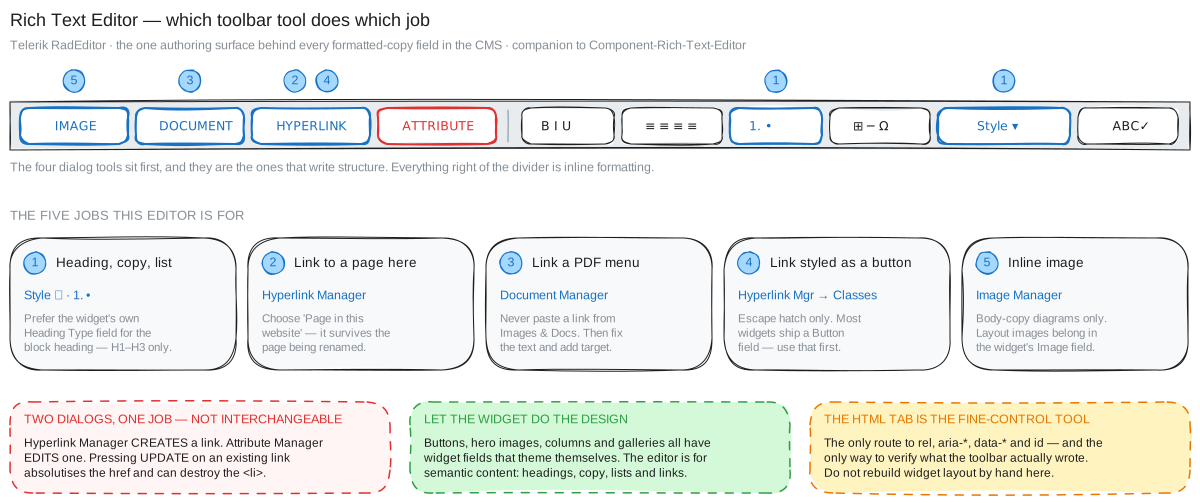 The toolbar, and the five jobs this editor is for: writing headings and lists, linking to another page, linking to a PDF menu, making a link look like a button, and placing a picture inside the text. The four buttons on the left each open a window. Everything to the right of the dividing line formats the text you have selected.
Step-by-Step Instructions
1. Find the Editor
You meet the same editor in three places:
A widget's content field ( Content, Intro Content, Description) One field among many. It starts closed, behind a green✎ Edit link Inside a nested item (a slide, a card, a feature item) The same closed field, one level further in The Text widget A full-page form. The editor is already open and is the widget's only field
- Open the page in the Page Editor (see how to edit an existing page).
- Hover over the widget until it is highlighted in green, then click Edit.
- Find the content field and click
✎ Editto open the editor.
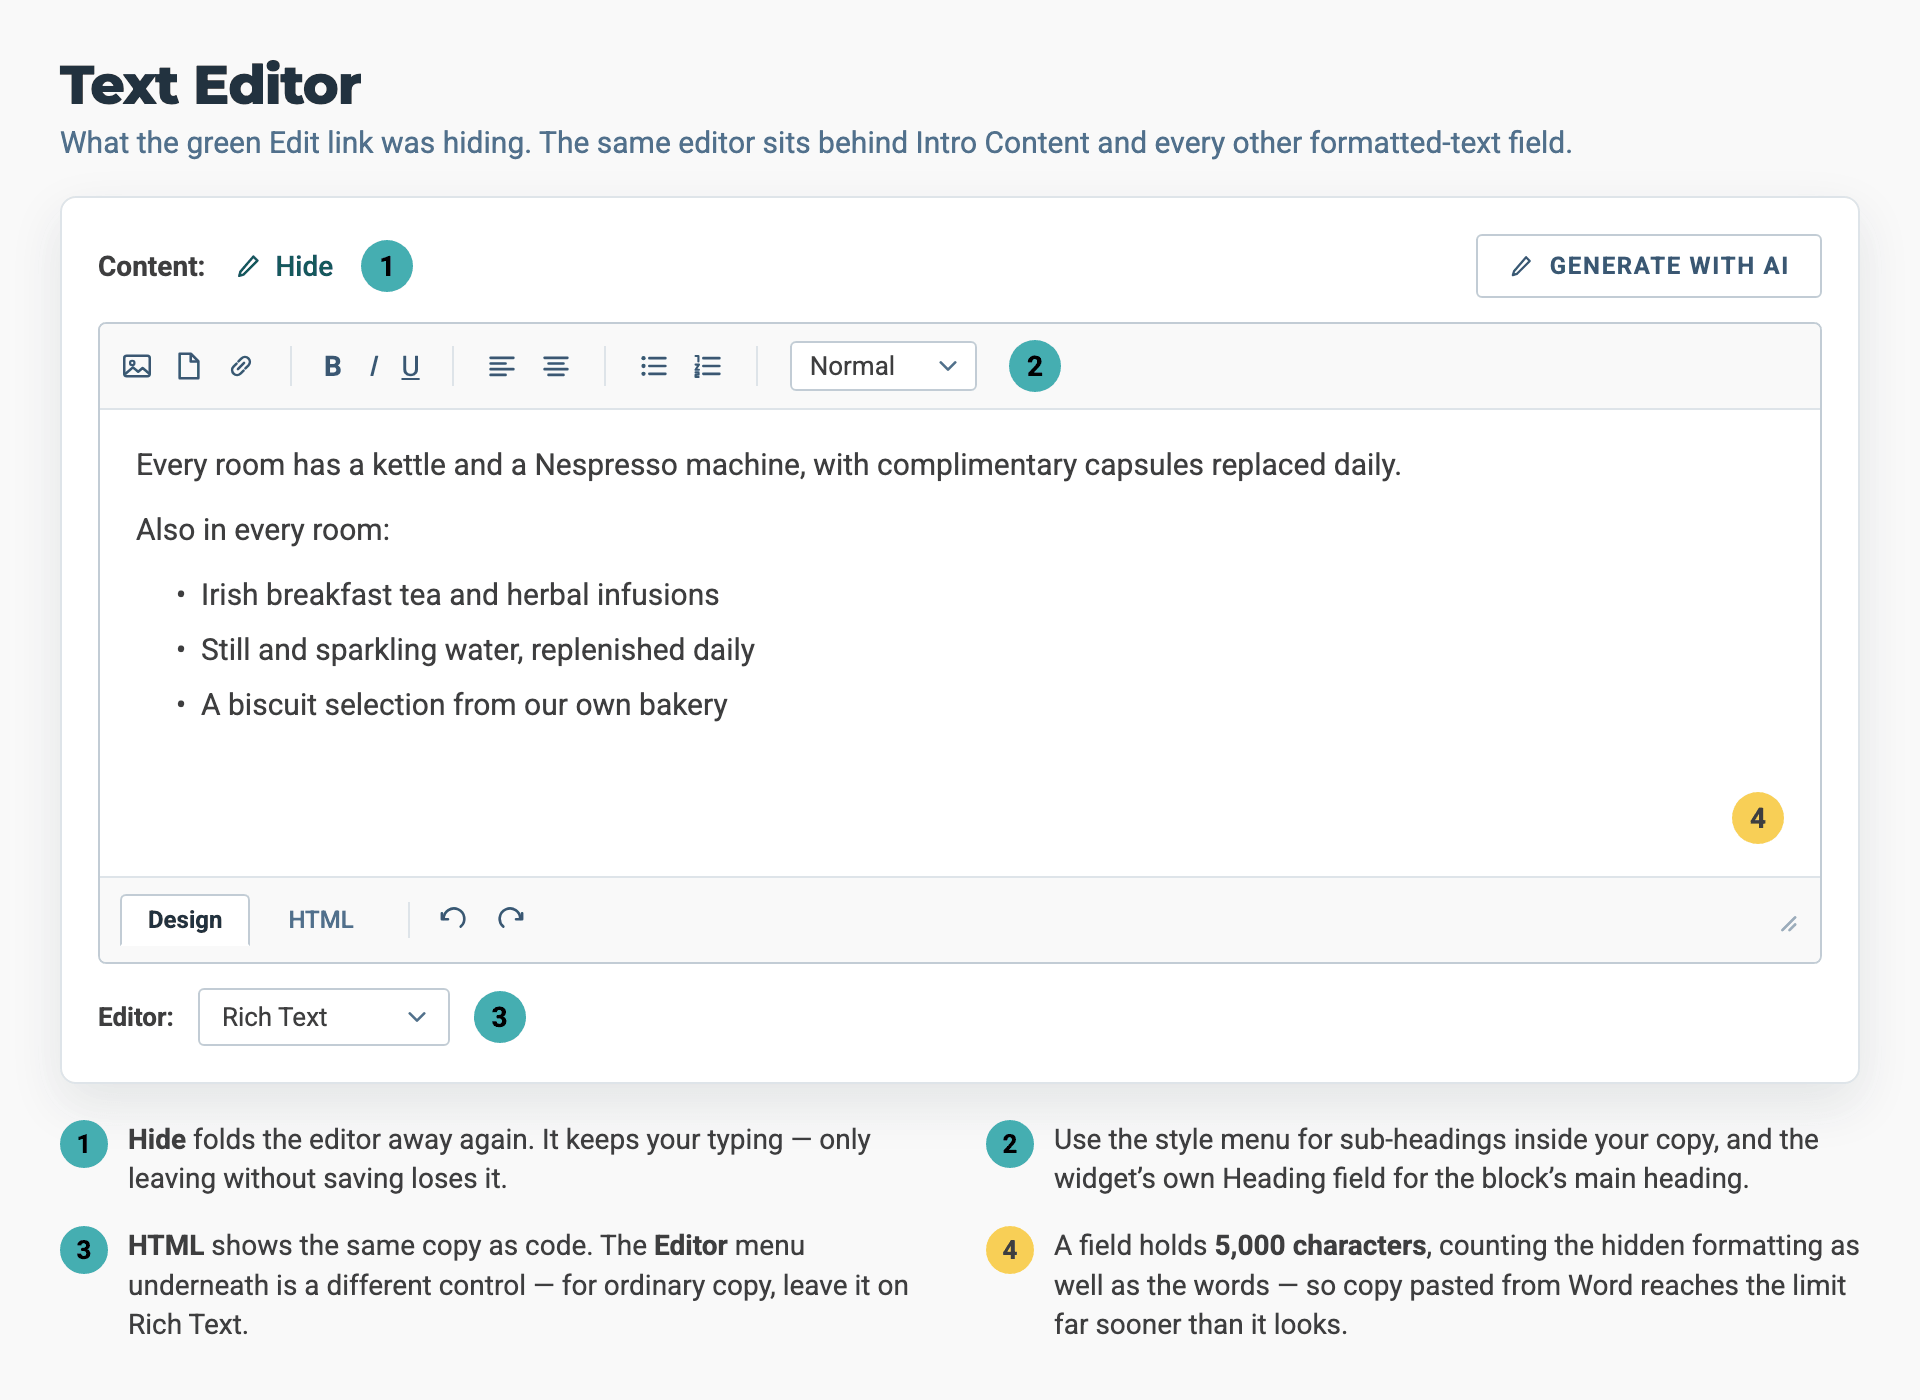
The editor after you click Edit. Hide closes it again and keeps what you typed. The Editor menu below it is a separate control. For ordinary text, leave it on Rich Text.
Note
The closed field shows raw text, not a preview of the page. It removes all formatting. A list of four bullet points appears as one long line, and accented text appears as Gaudí’s and not as Gaudí's. This is normal. It does not mean the content is broken. Click Edit before you decide that anything is wrong.
Closing the editor again does not lose your changes. They are kept until you save the widget.
2. Check Whether the Editor Is the Right Place
Before you use the toolbar, ask whether a widget field already does the job:
| You want | In the editor? | Better route |
|---|---|---|
| A paragraph, a heading, a list | ✅ Yes | — |
| A link inside a paragraph | ✅ Yes | — |
| A link to a PDF | ✅ Yes, with the Document Manager | — |
| A call-to-action button | 🟡 Last resort only | The widget's own Button / Link field |
| A hero, banner or feature picture | ❌ No | The widget's Image field |
| Two columns, a grid of cards, a gallery | ❌ No | A layout widget, such as Columns, Feature List or CTA Grid |
| Your own colours, fonts or spacing | ❌ No | Your website's theme, not the editor. Styling typed into the editor clashes with your website's design and breaks on phones |
The button row and the picture row have the same reason behind them. A button or a picture works in the editor only if you type in a class name by hand. A class is a short code that tells the website how to style something, and the right one differs from theme to theme. Nothing warns you if you type the wrong one. The widget's own Button and Image fields add the styling for you, and they still do if your website's theme is ever changed. Use them wherever they exist. The editor methods below are for the cases a widget cannot handle.
3. Write a Heading, Copy and a List
- Type or paste your text. Enter starts a new paragraph.
- Set sub-headings with the Paragraph Style dropdown (
Normal,Heading 1–Heading 6). - Use the Numbered List and Bullet List buttons for lists. Never type the dashes or numbers yourself.
- Click the HTML tab (bottom left) to check what the editor has written.
For the main heading of the block, use the widget's own Heading Type field, not Paragraph Style. Many widgets have a Heading Type dropdown just above the editor, limited to H1 · H2 · H3. Paragraph Style offers H1 to H6 and checks nothing. It lets you put a second
in the middle of your text, which confuses screen readers and search engines. Keep Paragraph Style for sub-headings within the text.
The field holds 5000 characters, and hidden code counts. HTML tags, styling and &entity; codes all use up the limit. Text pasted from Word can reach the limit when it looks much shorter than 5000 characters.
4. Link to Another Page on This Site
Select the text you want to turn into a link, then click Hyperlink Manager (the third toolbar icon, or Ctrl+K).
- Choose Page in this website.
- Pick the page from the dropdown. It is one long list, and the hyphens before a name show its level:
Home,-Rooms,--Classic Double Room. - Set Link Target. Choose
New browser windowfor a link that leaves your website. Leave it blank for a link to one of your own pages. - Click Update.
Always choose "Page in this website" and do not type the address. The link then points at the page itself, so it still works if the page is renamed or moved. A typed address does not.
The Include URL Parameters box adds extra details to the end of the link. This is where the details of a booking link go (see how to add a booking link). The same window also offers Phone number and Email. Use these to make a link that starts a phone call or an email.
5. Link to a PDF (Menu, Brochure, Price List)
Note
Use the Document Manager inside the editor. Do not go to Images & Docs and copy a link. The first link that Images & Docs offers points at the platform, not at your website, so it does not work for your visitors. The Document Manager adds the correct link every time.
- Click in the text where the link should go.
- Click Document Manager (the second toolbar icon).
- Choose the folder, select the PDF, then click Select Document.
- Fix the two things it gets wrong. See the note below.
Warning
Type over the word Document to fix the text. To open the link in a new tab, use the Attribute Manager: add target = _blank, and add rel = noopener at the same time. Do not use the Hyperlink Manager for this. It rewrites the link address, which was correct.
Make two fixes each time you add a document:
| What you get | What you want | |
|---|---|---|
| Link text | the word Document |
the real name, such as "À La Carte Menu" |
| Opens in | the same tab | usually a new tab |
Check the HTML tab afterwards. Sometimes an empty <a> tag is left inside the link, and you should delete it.
Adding four menus to a restaurant page? Type the four names as a bullet list first. Then select each name in turn and add its document. If you add the links first and make the list afterwards, the list can break.
If the document is not in the list, it has not been uploaded yet. The Add Documents button in the same window uploads it, and you keep your place in the editor. See how to upload images.
6. Make a Link Look Like a Button
Check first whether you need to. Most widgets that need a button already have one. CTA, Feature List, Carousel and Introduction all have a Button or Link field. That field styles the button for you and gives you the ADA Button Text field beside it. Use it wherever it exists.
Treat this method as a last resort. Use it for a "download the wine list" button in the middle of a paragraph, or for a second button in a text block that has no button field of its own.
- Select the link, or create it first.
- Open the Hyperlink Manager.
- Enter the classes in the Classes field.
- Click Update.
btn btn-default The standard button in most themes btn btn-primary Primary emphasis btn btn-secondary Secondary emphasis
Warning
Button classes differ between themes. A class that makes a button on one website shows plain text on another. Find a button that already exists on the same website, open it on the HTML tab or in the Attribute Manager, and copy the classes it uses.
To add classes to a link that already exists, use the Attribute Manager instead. See step 8.
7. Insert an Inline Image
Note
In almost every case, the picture should not go in the text editor. A picture placed in a widget's Image field is prepared for you. The website makes small, medium and large versions and shows the right one. It uses your focal point to crop the picture for each screen size. Its alt text comes from the library. A picture added in the editor gets none of this. There is one size only, with no focal point, and a visitor on a phone downloads the full-size original.
Use the Image Manager only for a picture that belongs inside the text, such as a diagram, a small illustration or a logo in the middle of a paragraph.
- Click in the text where the picture should go, then click Image Manager (the first toolbar icon, or
Ctrl+G). - Choose the folder and the picture, then click Select Image.
- Set the alt text on the HTML tab. The alt text is copied from the library at the moment you add the picture. If you change it in the library later, the copy here does not change.
- Add the theme's responsive class. See below. Without it, the picture keeps its full width and is too wide for the screen on a phone.
- Keep the file small. Nothing makes it smaller for you.
Make it responsive
The Image Manager adds a plain class):
Luna, Aurora, Interstellar, Gemini, Equinox, Galaxy
Class to add: img-responsive
What it does: max-width: 100%; height: auto
Supernova, Retrograde, Atlas, Neptune, Solstice
Class to add: img-fluid
What it does: the same, under a newer name
Warning
You cannot swap one name for the other, and nothing warns you if you use the wrong one. No theme knows both. The older themes know only img-responsive, and the newer ones know only img-fluid. With the wrong one, the picture is still too wide on a phone, and nothing in the editor tells you. If you do not know which your website uses, find a picture on the same website that already has one of these classes and copy it, as you would for a button.
This is the best reason to use the widget's Image field instead. A picture placed there needs no class at all. The platform prepares the right sizes, and your website's design makes the picture fit and applies your focal point. The class is only needed for a picture in the text editor, which is the case to avoid.
8. Edit Something That Already Exists
Two windows edit links. They look as if they do the same job. They do not.
Warning
Never press UPDATE in the Hyperlink Manager on a link you did not just create. If you open it on an existing link and press UPDATE, it rewrites that link even if you changed nothing. The link address becomes a full https://cms.bookassist.com/… address that points at the platform and not at your website. It can also break the list the link is in.
rel, aria-label, data-*, id or title Attribute Manager
The Attribute Manager shows one row for each attribute on the item you selected. Each row has an X to remove it, and Add Attribute adds a new one. It changes only what you change yourself.
9. Clean Up Copy Pasted from Word
Text pasted from Word brings hidden mso-* styling with it. This fills up the field and can override your website's design.
Select the pasted text, then click Format Stripper → Strip Word Formatting (the third button in the bottom toolbar).
This is also the fix when a field reaches the 5000-character limit sooner than you expect. Hidden code filled it, not your words. The Format Stripper's other options each remove more formatting than the one before, so start with the Word one.
10. Draft Copy with AI
Some text fields have a GENERATE WITH AI button at the top right of the row. On a widget field you need to click Edit on that field first, or the button stays hidden.
Set the Content Type first. It changes the form and adds fields, such as Room Name and Room Amenities, that are not shown otherwise. Then open Toggle Writing Styles. Tone and Format start empty, so if you skip them the tool has no guidance on how to write. Set the Language here too. It starts on English. For British spelling, choose English (UK), which is a separate entry that you have to pick each time.
When you are happy with the draft, Copy to Text Field puts it in the field and replaces everything already there. If you want to keep some of what is in the field, select and copy the new text yourself and paste it in.
For the full steps, see how to generate content with ai.
11. Save and Publish
- Quick Save (Text widget only) saves and keeps the editor open. Save saves and closes it.
- Click Preview to check how the result looks on the page.
- Click Publish. Nothing appears on your live website until you do.
Pro-Tips & Troubleshooting
- Check the HTML tab after you add a list, a link or a picture. Build it with the toolbar, then switch to HTML and read what the editor wrote. Most problems are a difference between the two.
- The
Editordropdown below the frame is not the HTML tab. The HTML tab (bottom left) switches the same editor between the normal view and the code view. That is the one you want. The Editor dropdown replaces the editor with a different one, for fields that hold only HTML, CSS or JS code. Leave it alone for normal text. - Split Text Widget cannot be undone. On the Text widget, it divides the widget in two at the cursor for good. You cannot join the two halves again. If you need two blocks, add a second widget instead.
- One long line in a closed field does not mean it is broken. Lists, tables, paragraphs and accented letters all look wrong while the field is closed, and are fine in the editor.
- Save often during long edits. You are logged out after a period without activity, and unsaved work in an open editor is lost.
- Code you were given by someone else goes in the HTML tab. This could be a signup form from a mailing list provider, or anything else you receive as code. Paste it there and it appears on the page exactly as written. See How to Add a Signup Form From Another Provider.
Never do this
- Never press UPDATE in the Hyperlink Manager on an existing link. It points the link at the platform and not at your website, and it can break a list. Use the Attribute Manager.
- Never paste a link copied from the menu on a file in Images & Docs. Preview Link points at the platform. Add documents from inside the editor.
- Never build a layout in the editor. Tables used as grids, and styling typed into the text, clash with your website's design and break on phones. Use a layout widget.
- Never assume Paragraph Style keeps your headings in order. It offers H1 to H6 and checks nothing.
- Never judge content by how it looks in a closed field. Open the editor first.
→ Next: How to Generate Content with AI — the AI writing tool in full